French braid: history, schemes and design options
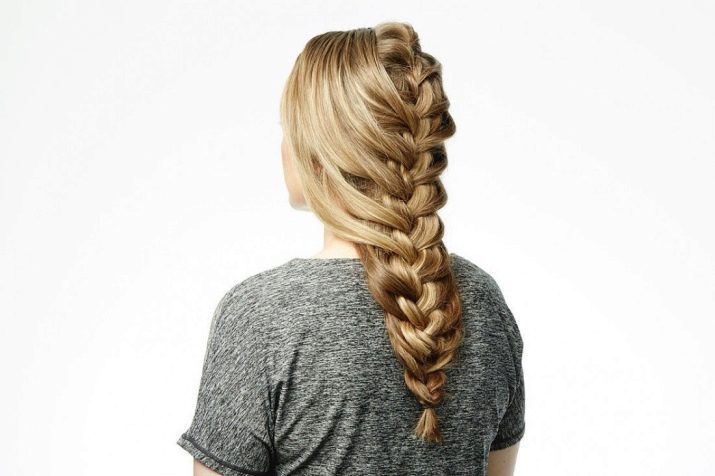
One of the most popular weaving options is the French braid. A huge variety of patterns allows you to choose a hairstyle for both everyday life and holidays. A simple and very beautiful braid will adorn any look. Popularly, the French braid is sometimes called a spikelet.
A bit of history
The most popular hairstyle appeared in the distant 18th century. Lovers of hairstyles should be grateful to the court hairdresser. According to some reports, the first such spits were captured on rock paintings (about 6 thousand years ago). The first mention of such a name for the spit was in 1871 in an American magazine. The exact origin of the French braid pattern is unknown.


The name suggests that the authorship belongs to French stylists. The nuance is that before all new trends were assigned to France automatically, because the country is considered the center of fashion. Therefore, it is rather rash to claim that the name is directly related to the origin.
What do you need to weave a braid?
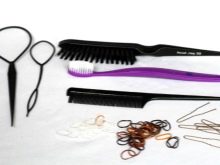
Weaving does not require special skills, just follow the instructions clearly. You do not need to purchase any specific accessories.
Most of the necessary things are in the arsenal of every girl, and they should be prepared before starting to weave a French braid.
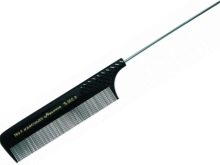
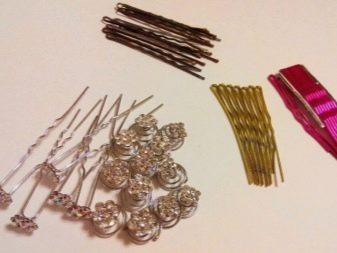
- Massage brush and comb with a metal tail. The first will be needed for a thorough combing, and the second will help to neatly separate strands of the same thickness.
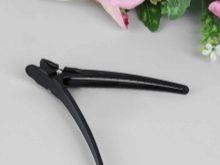
- Hair clips. They will help to separate the non-working area during weaving.It is especially important when you create a complex hairstyle in which you combine several braids.
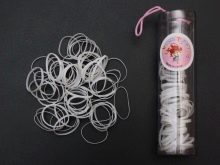
- Silicone rubber bands. Select transparent or as close to hair color. Used to secure the ends securely. You can wrap the top with a decorative elastic band.
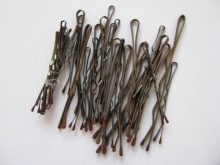
- Invisibles or hairpins. Such a tool is indispensable for braiding on thick and heavy hair. Simply secure the individual parts of the braid so that it does not come loose.
- Ribbons, hairpins and other decorative items. You can decorate the braid to your liking.

It is important that the hair is at least 50 cm. Shorter haircuts do not allow for a sufficient number of weaves.
Be patient when braiding your hair. The first experience may not be very successful. Before shaping a hairstyle for a holiday, it is better to hone the skill.
You can do beautiful hairstyles yourself or ask someone for help. There is a difference in weaving on yourself and on another person.
If you are weaving a French braid to another person, then simply delve into the scheme, and you are guaranteed to get an excellent result the first time.
Benefits of braiding on someone else's hair:
- you can work with both hands in a comfortable position;
- good visibility, it is easy to track the quality of weaving;
- minor flaws can be instantly corrected;
- it is easier to regulate the uniformity of tightening the strands;
- due to the comfortable position, hands are less tired.
You can also achieve a good result when braiding on your hair. It is important to comply with a number of conditions.
- Place 2 large mirrors opposite each other.
- Exercise a lot.
- Place all the tools you need on the table close at hand. Excessive body movements can lead to a loss of control over the strands.
- Prepare your hands. When weaving braids, you will have to keep them suspended for a long time. Shaking hands can ruin the hairstyle, you will have to redo it.
- Do not braid on clean hair, otherwise the strands will crumble.

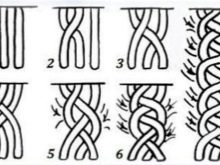
Simple weaving patterns
Today, you can make a French braid in different ways. The classic scheme is always the basis, so it is worth starting the study with it. Experts advise to do hair only on clean hair.
Avid lovers of braids claim that the hair that was washed two days ago is the best way to keep the hairstyle.

If your hair is curly and unruly, you can start braiding on slightly damp hair.
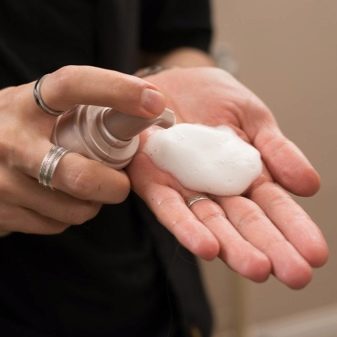
For better fixation, you can use wax, gel, mousse, foam or varnish. Such funds will help not only to keep the braid intact, but also to get rid of the falling strands.


And a few more useful recommendations.
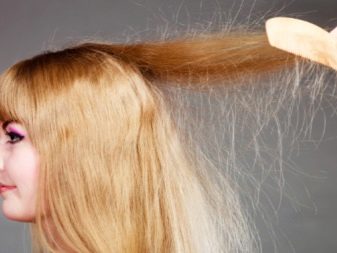
- Tired and dry hair will become highly electrified. During weaving, the hairs will begin to stick to each other, to the comb, and even to your hands. For prevention, use suitable balms and nourishing masks. As an emergency solution, use an electrostatics remover or a spray bottle filled with water.

- Immediately after washing, the hair loses its protective shell and becomes highly susceptible to aggressive influences. If you immediately braid the braid, then kinks will appear. Wait a couple of days for the hair to be coated again with a light layer of protective oil. Frequent braiding on freshly washed hair can destroy its structure.
- It is important to create conditions in which you can see the progress of the weaving. You can position the mirror in front of you and behind your back. A simpler option is to ask the other person to make sure the hair is woven neatly into the braid.

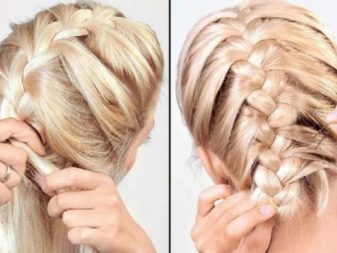
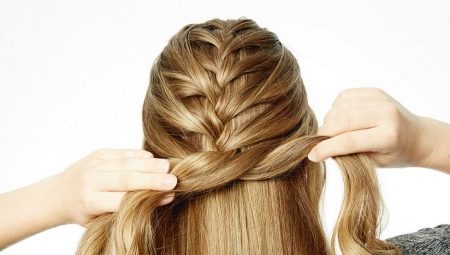
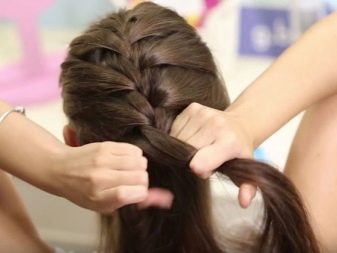
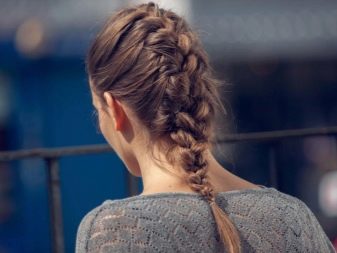
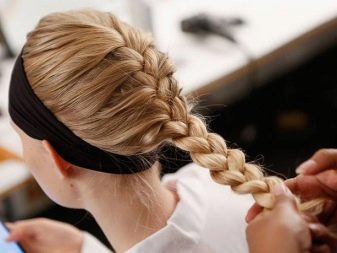
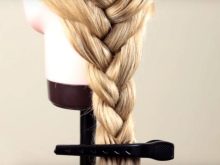
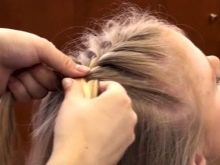
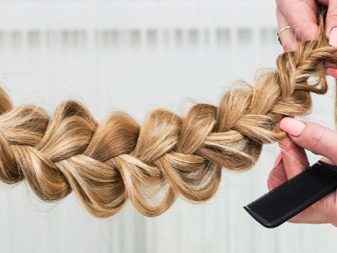
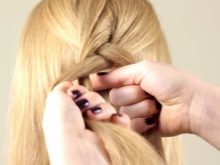
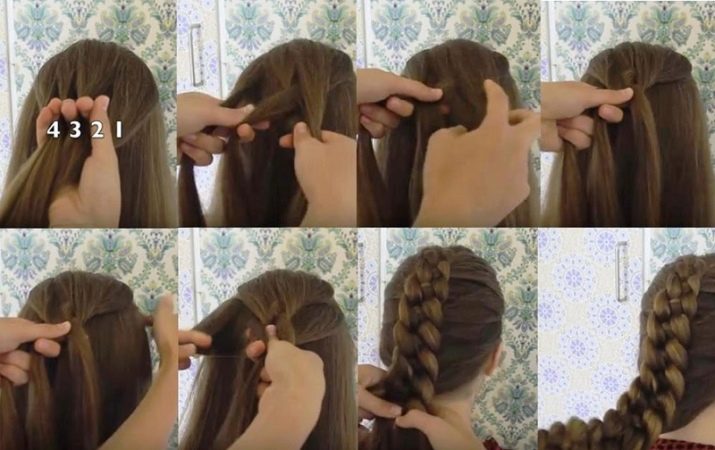
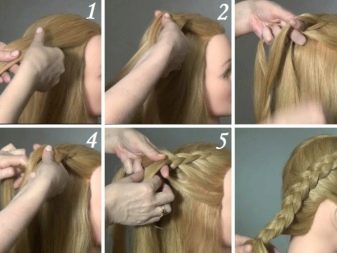
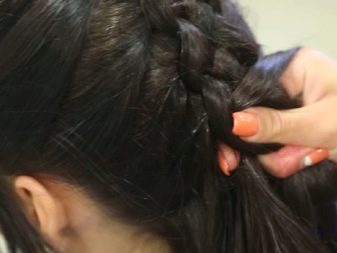
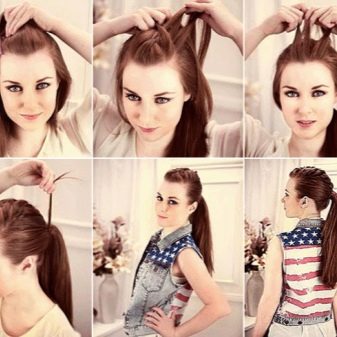
From the back of the head
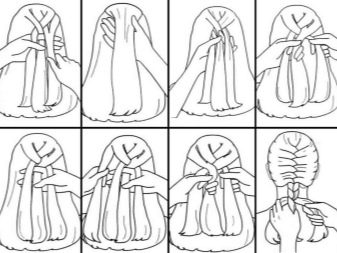
This weaving is considered classic, let's study its scheme.
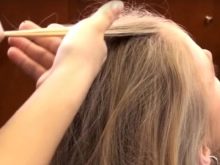
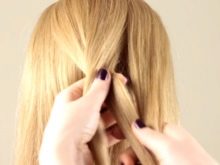
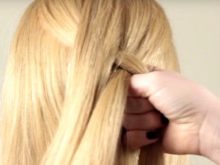
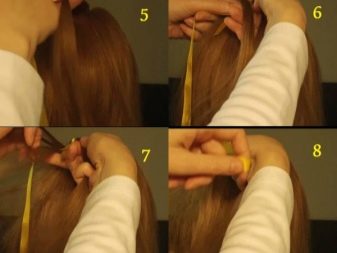
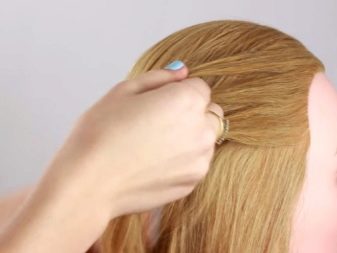
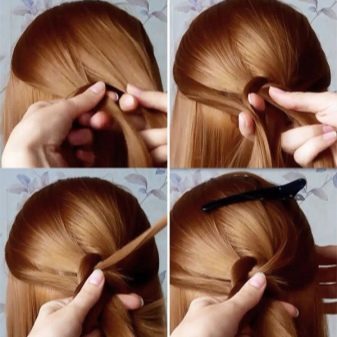
- Divide the combed hair into 3 identical strands. Keep the side strands, and leave the middle one free.
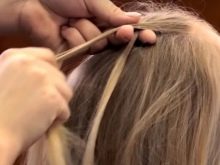
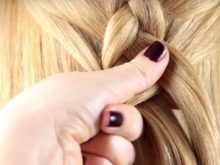
- Place the right strand on the middle one, hold both in your left hand so that the center strand moves to the edge. Pinch the outer strand with your little finger and ring fingers, hold the middle curl on the middle finger.Keep your index finger straight, and use your thumb as a safety net so that hair does not fall out.


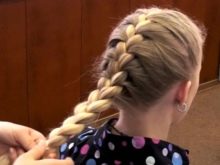
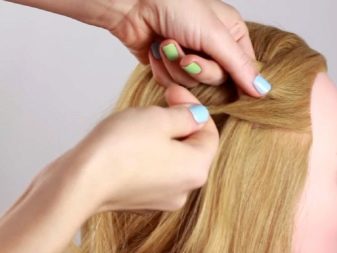
- Watch the stretch. The braid should be fairly tight along its entire length.
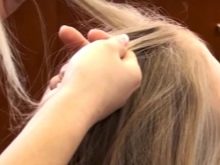
- Put the left strand on the central one, pick it up with your middle finger. The position of the fingers is the same.
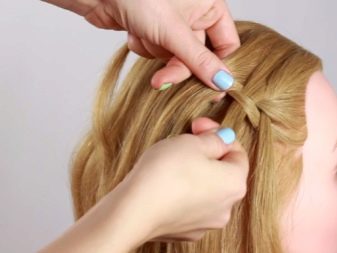
- The first binding has already been completed. All subsequent ones do the same. Move the right and left strands alternately to the place of the middle strand.
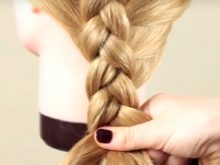
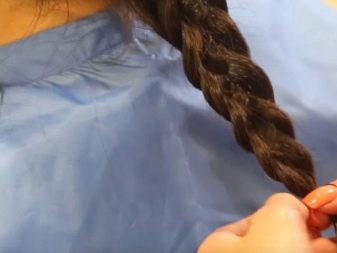
- Secure the end with an elastic band or tape.
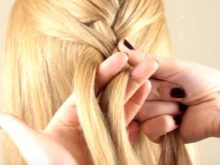
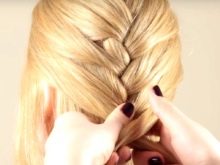
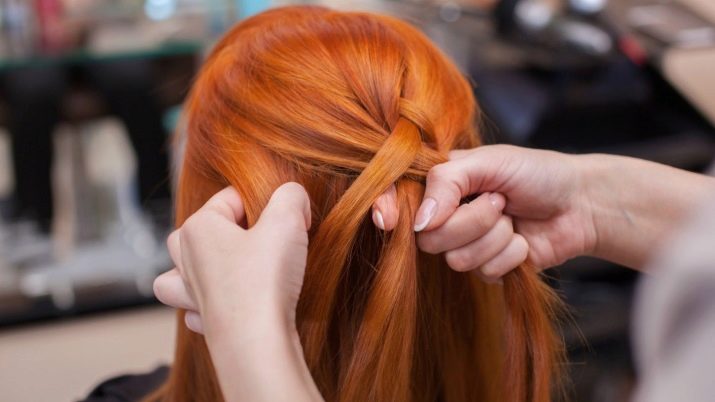
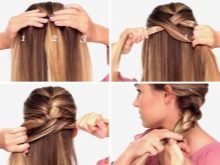
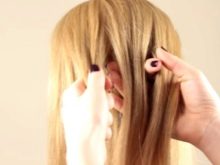
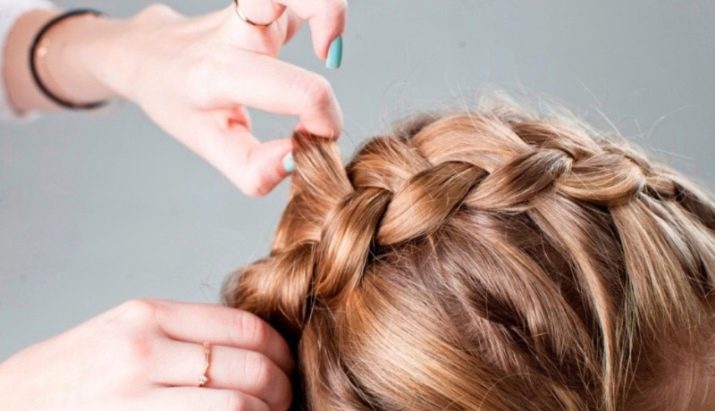
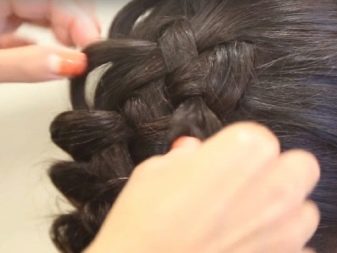
On the parietal zone
This braid starts higher and looks more interesting. During braiding, you need to add hair to the strands. It is important that the braid, even after adding, is woven from three parts. You can make a braid with a tail, or weave it all the way. Do everything according to the instructions.
- Separate a fairly wide strand on the parietal region.
- Divide the separated hair into 3 equal sections. Hold with your middle and index fingers.
- Transfer the outermost strands to the middle one at a time. So make 2 full bindings.
- Add a small amount of hair from the desired side to the outer strands. The additional strands should be thin, make sure the additives are evenly distributed.
- Walk in this way to the base of the neck. At this point, you can simply fix the braid with a tight elastic band. If you wish, add it to the end, but without any additions.
- It is necessary to tie the tip with a simple elastic band or pin it so that the hairstyle does not come loose.

On the side
The braid looks so elegant that from the first time it may seem mistakenly that it is difficult to weave. A simple weaving pattern will simplify the task.
- Part on either side. Toss combed hair to one side.
- Start with a simple French braid. One by one, put the outer strands on the middle, swapping them.

- The braid should go down behind the ear. Hair from the opposite side is woven into the braid horizontally. Make sure the descent is smooth and even.
- Braid to the end, secure the ends with an elastic band or hair clip.
- Varnish for fixing, then straighten the braid slightly with your hands.
Vice versa
Recently, this type of weaving has been in great demand. It is a little more difficult to make such a braid, but the result lives up to expectations.
Step-by-step instructions will help you make an original and stylish weaving.
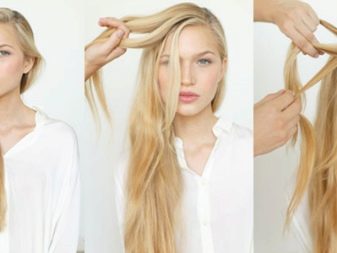
- Comb the hair with a regular fine-toothed brush and divide into 3 equal strands.
- Place the right strand under the center strand.
- Also weave the left strand under the central one.
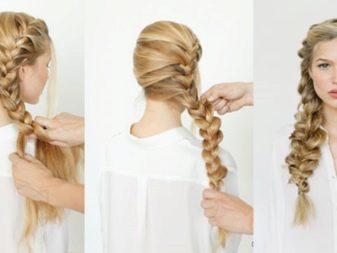
- Pick up thin strands on the sides and connect them to the outer ones. Continue to weave under the middle section.
- Weaving according to this principle should be finished at the back of the head near the neck.
- If desired, you can continue the braid below, but without additional strands.
- Lock the tip.
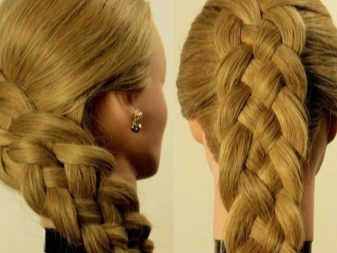
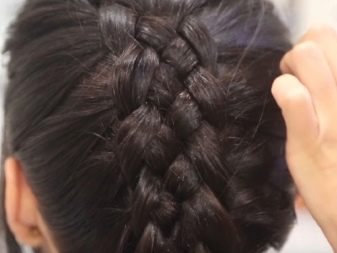
Of four strands
This kind of weaving is ideal for festive events. The braid looks unusual and visually increases the density of the hair.
- Divide the combed hair into 4 equal strands.
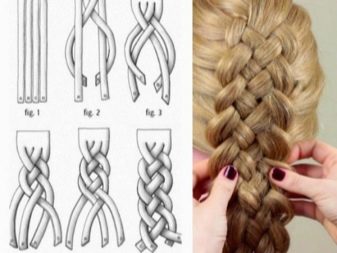
- Lay the third strand on the right on the first. Carefully make sure that the first left strand is in second place.
- Move the leftmost strand under the two nearest and over the far right.
- Add some hair to the outer right strand. Place it under the two next to each other and on top of the extreme left.
- Continue braiding to the desired length.
Hairstyles with French braids
Beautiful and interesting weaves are part of both everyday and festive hair styles. Learning to make beautiful hairstyles with French braids is quite simple, just follow the instructions step by step. Almost all options work well on long hair.
Braids can be combined, braided two or three at once. The hairstyle is perfectly complemented by a ponytail or light curls.

Usually the ends are fixed with inconspicuous elastic bands. From above, you can tie a beautiful ribbon or attach a hair clip. For styling, use oil, wax, varnish.
There should be little funds, otherwise the braid will open faster under the weight of its own weight.
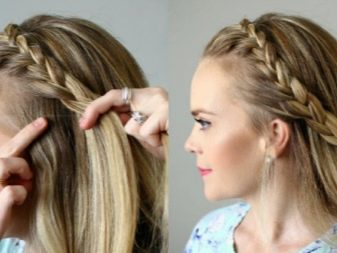
With ribbon
To create a hairstyle with a French braid, you need to take a narrow ribbon. It is better to use products with wire for additional fixation. The double braid looks quite interesting, so it will decorate both everyday and solemn look.
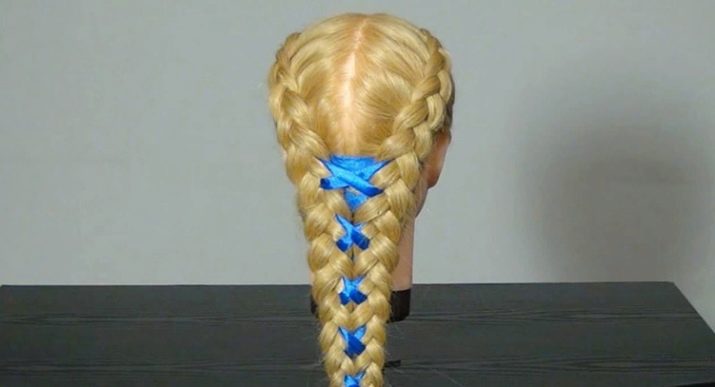
Weaving is done in steps.
- It is important to make the right parting from two parts. Draw the first line from the ear to the middle of the crown, and continue the second straight down to the middle of the back of the head.
- On both sides of the parting, two French braids are woven. They need to be made from thin strands of the same size, it is important to weave the hair tightly so that it fits snugly to the head. Place decorative tape under the first strand so that 15 cm remains on top.When weaving the first French braid, weave a ribbon under each strand. Follow this technique up to the beginning of the neck.
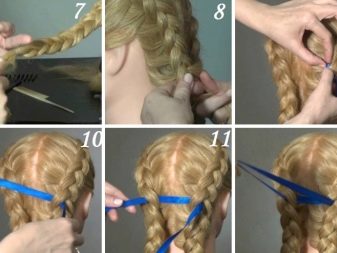
- Continue braiding the entire length of the hair, but without additional strands. Place tape under each binding. Secure the ends with silicone rubber.
- Weave the second French braid in the same way as the first.
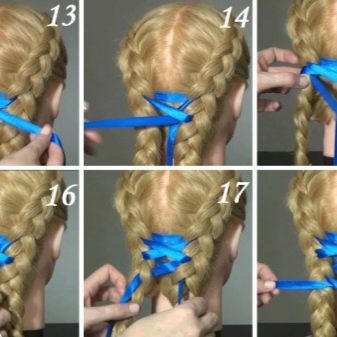
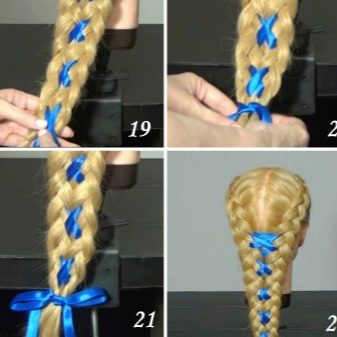
- Cross the braids at the level of the neck and wrap it in the center one by one, secure with hairpins or invisible hairpins. Decorate the ends with decorative ribbon, you can tie a bow.
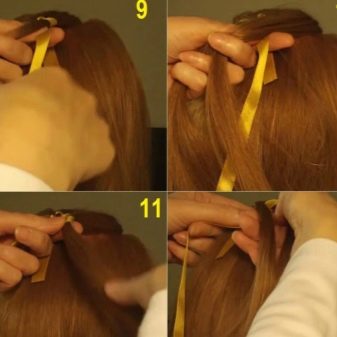
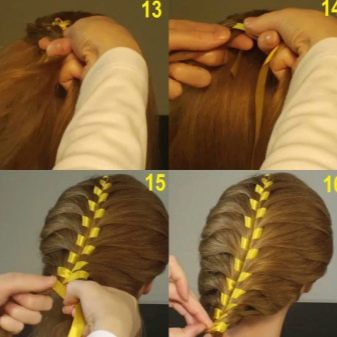
An easier way to perform a French braid with a ribbon will help out when there is very little time for training. The hair is easy to do for yourself. A simple satin ribbon is great; select the thickness based on the size of the braid. Step-by-step weaving includes a number of actions.
- Divide the hair into 3 equal parts. Tape around the middle strand.
- Put the left strand on the middle one, place the straightened tape on top, cover with the third strand.

- Braid the middle, right and left strands with tape alternately.
- Continue this weaving to the end.
- Secure the ends with an elastic band.
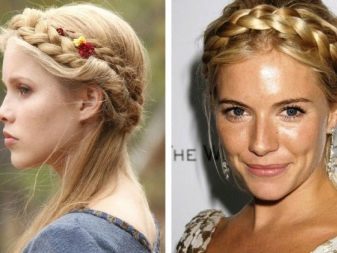
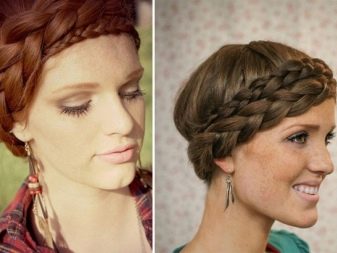
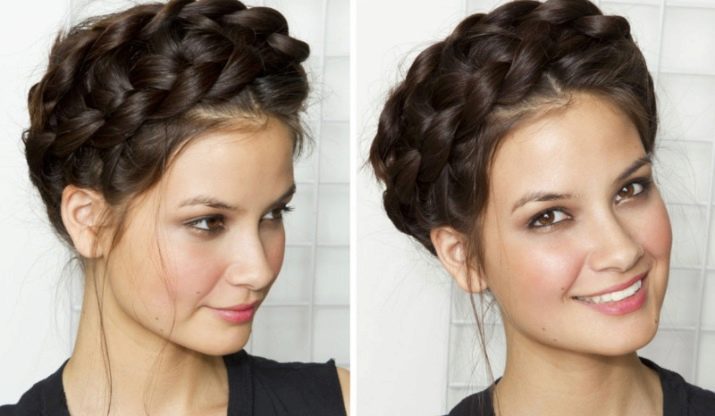
Bezel
Stylish hairstyle will not take much of your time, but will give your hair a neat and well-groomed look. An excellent option for owners of short to medium hair.
When weaving, make sure that the braid evenly overlaps the parting, as if hiding it.
Do the weaving in a simple pattern.
- Part horizontally on the top of the head.
- Pull the bottom of your hair into a ponytail.
- Beginning at the edge, weave a regular braid, adding parting from the side. Continue braiding to the end and secure with an elastic band.
- A beautiful hoop is formed around the head. If you are styling long hair, you can braid a large braid and wrap it in the same way.
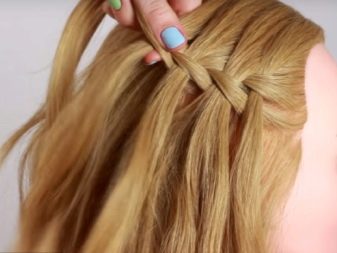
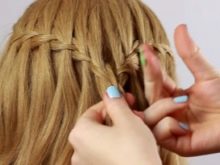
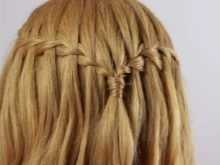
Waterfall
A French braid in an unusual design will complement the look for a festive event. Simple and effective weaving in combination with flowing curls will emphasize the evening look, attract the eyes of others.
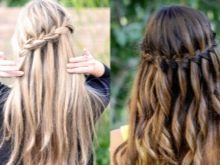
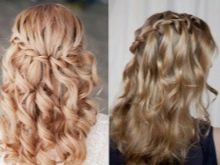

Follow the instructions for weaving.
- Divide the carefully combed hair into 3 equal strands, start weaving the French braid to one side. Make sure that the descent to the ear is smooth and even.
- In the process of weaving, you need to add small strands to the side parts of the braid. Make sure that all additions are evenly distributed.
- Braid the braid to the end, fix the ends with an elastic band.
- Twist loose strands into light curls in any convenient way. If you have a lot of time, then use cold styling options to reduce trauma to the hair structure.
- Cover the hair with a little nail polish for setting. Tie the ends with decorative tape, you can use a hairpin. Gently stretch the weave, give it a nice shape.

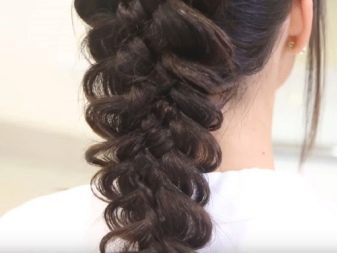
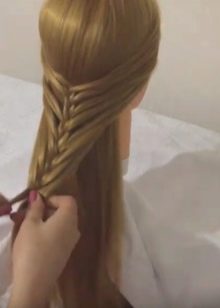
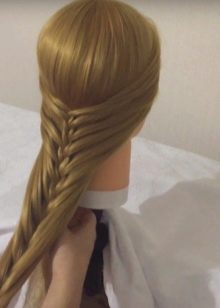
Fishnet braids
The classic French braid features clean lines and tight braids. If you move away from the standards, then you can create a magical openwork hairstyle. Brides often choose this hair styling option for a celebration.
Do your hair according to the instructions below.
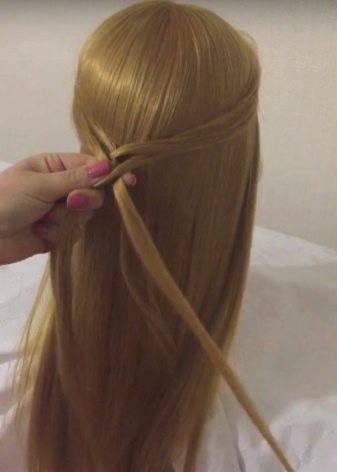
- Part the combed hair into sections to create a reverse French braid.Do not tighten too much, the weaves should be soft.
- Bring the weaving according to the standard pattern to the end, fix the ends with an elastic band. It is better to use the product to match the hair color.
- Gently pull the thin extra strands out of the side of the braid. The weave will become more lush and voluminous.
- Use wax or special oil to fix it. The tool will make the curls more pliable, which will simplify the process of forming the braid. It is important to correctly calculate the amount of wax in order not to weigh the hair down.
- The hairstyle can be decorated with hairpins or hairpins.
Air spit
Ideal for long, straight hair. The peculiarity of the braid is its lightness, so give it up if you have a physically active day ahead. Can be done both on loose hair and on a pre-assembled tail.
- Comb your hair towards the back of the head to completely remove the parting. Pre-align if necessary.
- Separate one thin strand from the middle and two of the same from the temple area. Make one full binding.

- Weave a thin braid with extra puffs on the sides, leaving the bottom hair loose. The result is a braid over the hair.
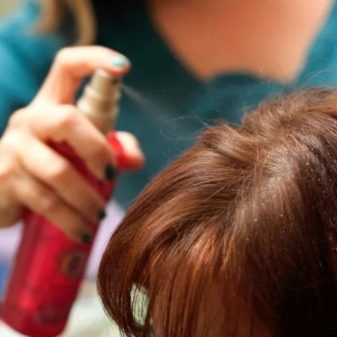
- Tie the ends of your French braid with a silicone rubber band. For reliability, you can fix your hairstyle with hairspray.
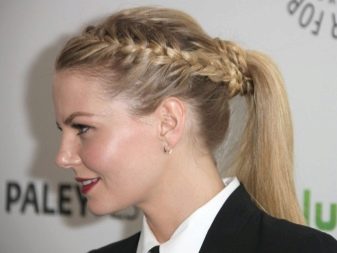
With a tail
An interesting combination of a regular ponytail with a French weave, perfect for everyday life. Hair will not interfere with you even with active physical work. Suitable for long hair only.
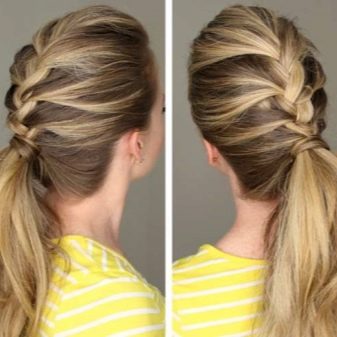

- Separate the wide strand from the top - from the face to the back of the head. Secure loose hair with bobby pins or clips to keep it out of the way.
- Divide the working section of your hair into 3 sections and braid a French braid with side additions.
- Continue braiding to the back of the head, and gather the remaining ends into a ponytail.
- Wrap loose hair on the right side around the elastic. Secure with invisible pins or hairpins.
- Wrap the left side of the hair in the same way.

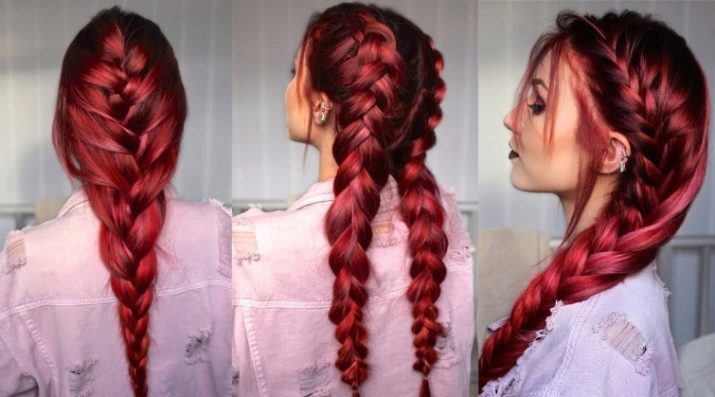
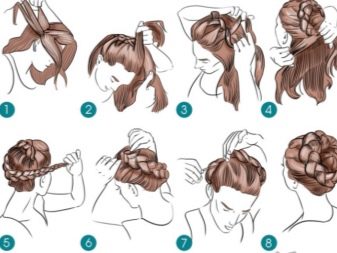
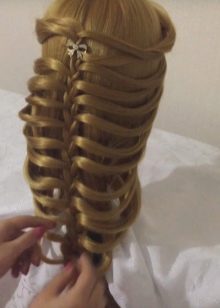
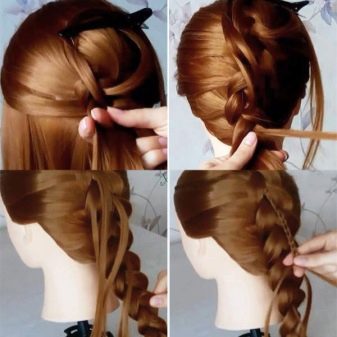
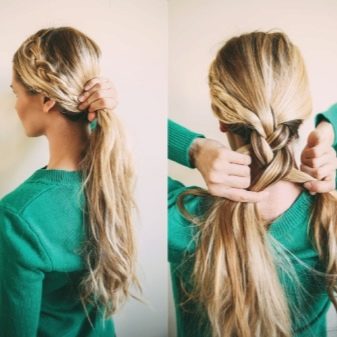
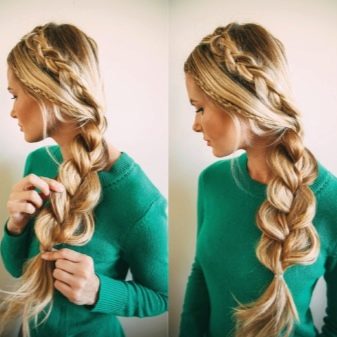
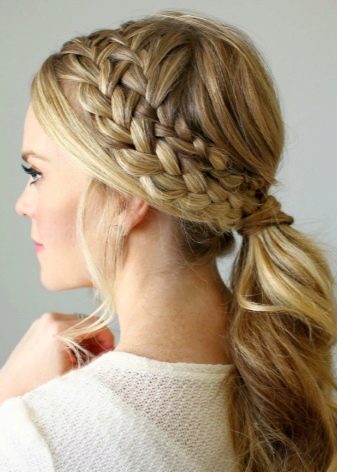
Double braid
The combination of two French weaves looks magical and is relatively simple to do. Be sure to take a single-row comb and small hairpins. Weave according to the pattern.
- Treat combed hair with gel, foam or mousse.
- Comb the top of your hair in the direction of the fall of the braid.
- From the very top, start to make a classic weave with extras on the sides.
- Go to your ear and secure with a transparent rubber band.
- Start making a larger braid. The principle is the same, but you need to weave additional strands from both the top and the bottom.
- Bring to the middle of the head and gradually add strands from the smaller braid.
- Finish to the end of the length. Secure the ends with an elastic band.
- Stretch the strands of the main braid slightly, secure with invisible ones. So the hairstyle will be more voluminous and airy.
- Spray with hairspray and add some accessories to your liking. After 5-7 minutes, remove the invisibility that held the elongated strands.
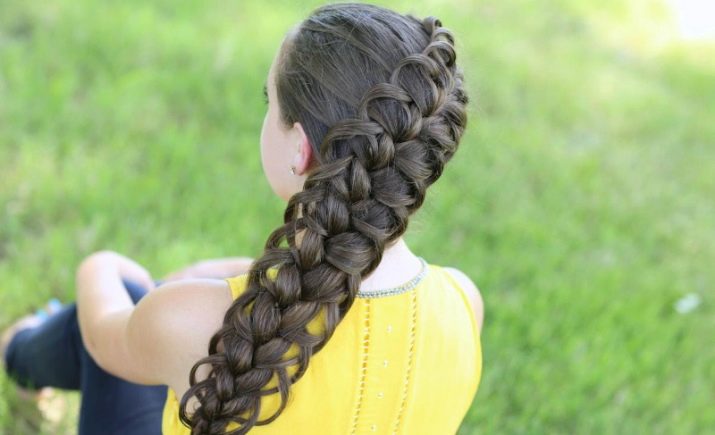
Beautiful examples
The French braid allows you to create very interesting and multifaceted images. Rest assured that with this hairstyle you will be the queen of the ball. And at the end, a few examples for inspiration.
- An interesting variation of the headband, a great option for a photo shoot.
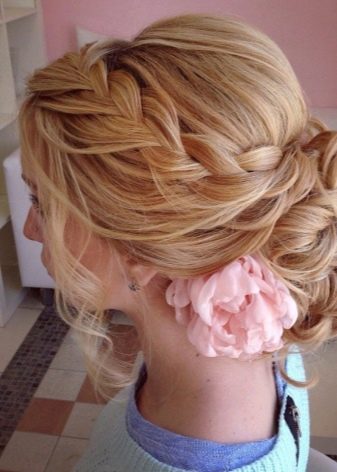
- Long hair is braided to one side. An excellent element of a gentle and romantic look.
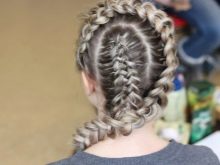
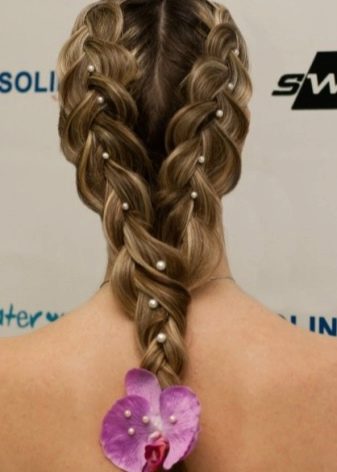
- A successful combination of two braids, which are gathered in a ponytail. It looks very unusual and bold.

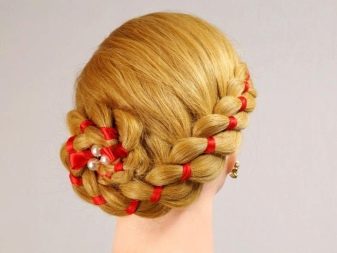
- Various shapes can be formed from weaving. Flowers look especially good. Can be decorated with hairpins with stones.
For instructions on how to weave a classic French braid, see below.


