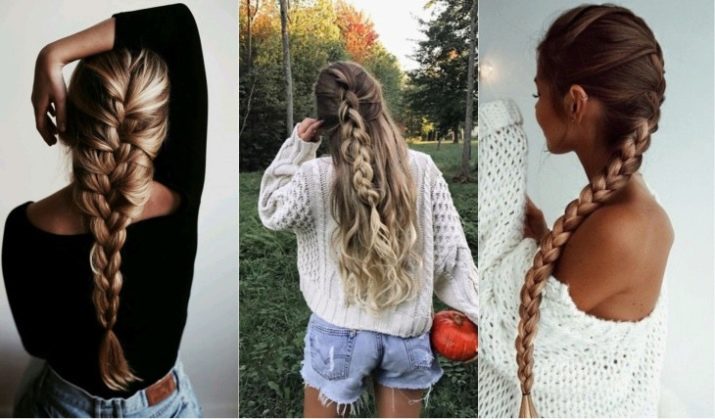
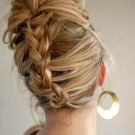
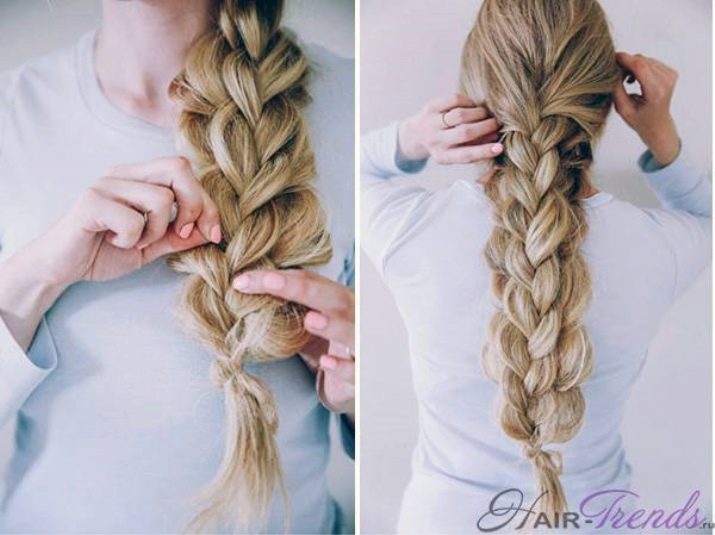
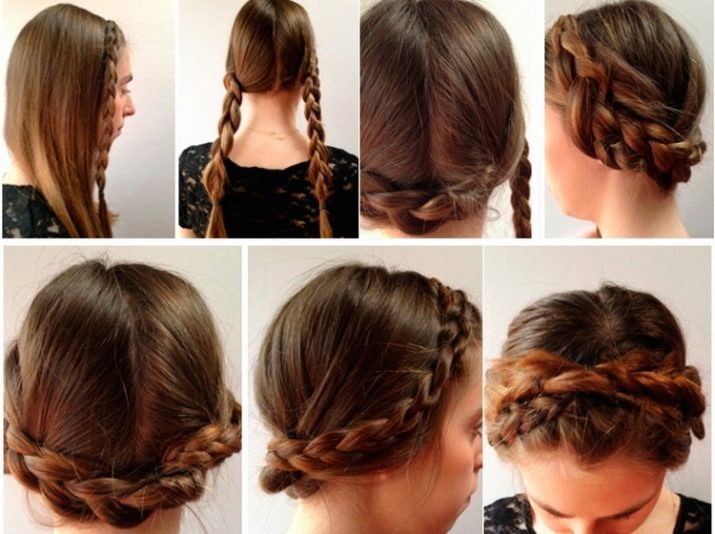
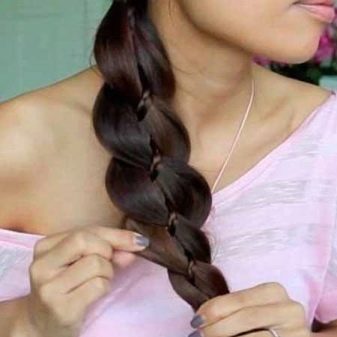
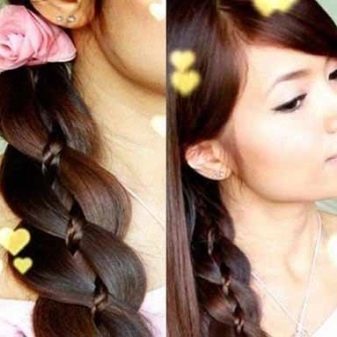
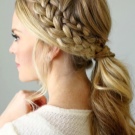
How beautiful to braid a spikelet?

Spikelet is one of the most popular hairstyles. It does not go out of fashion, it is distinguished by its beauty, simplicity in execution and versatility. This weaving method is suitable for all ages. If you learn the basic techniques of braiding, then the technique can be varied in the future. With the invention of new hair accessories, an ordinary spikelet can be easily modified, not inferior in beauty to even the most complex hairstyles.


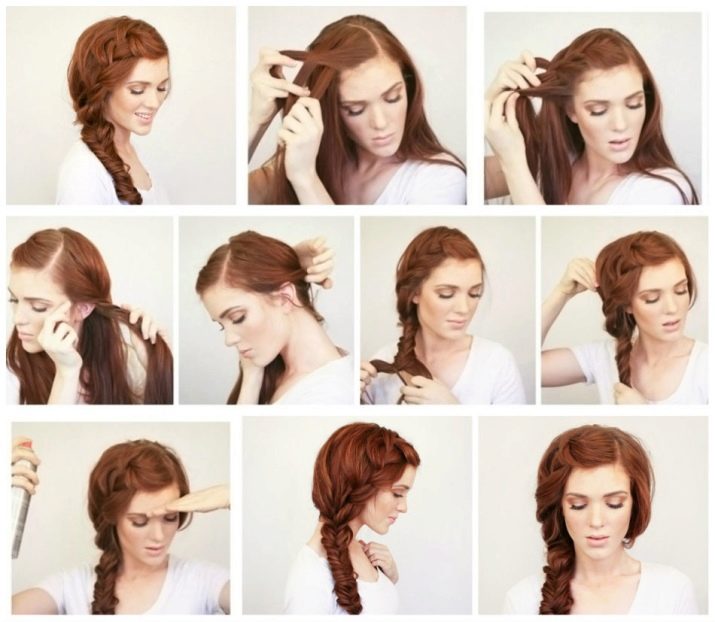
Classic version
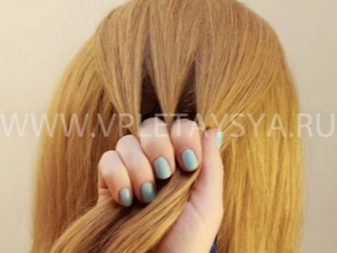
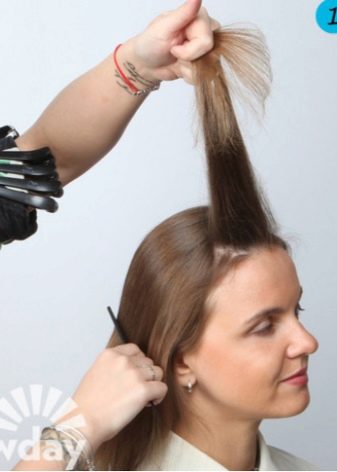
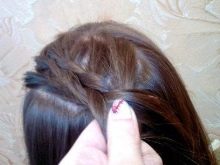
The spikelet is woven according to a simple pattern.
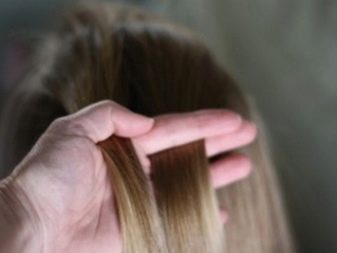
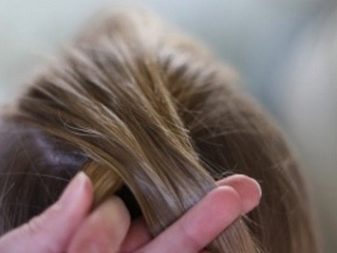
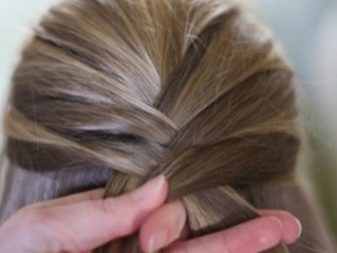
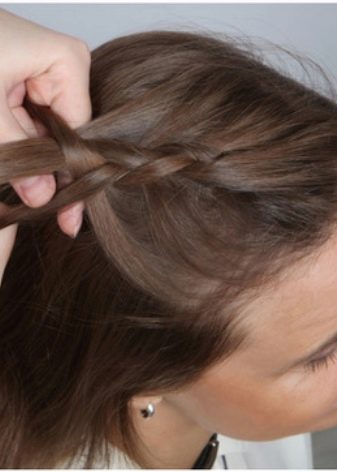
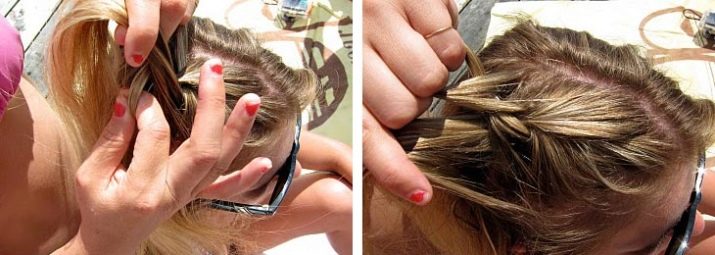
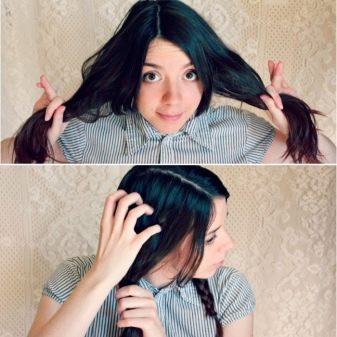
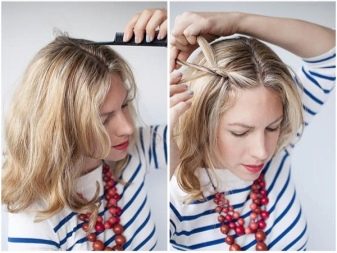
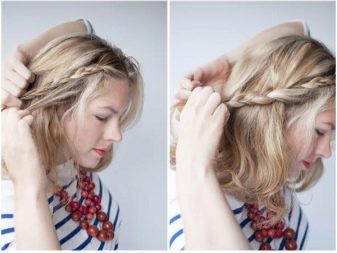
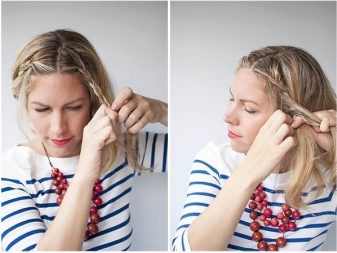
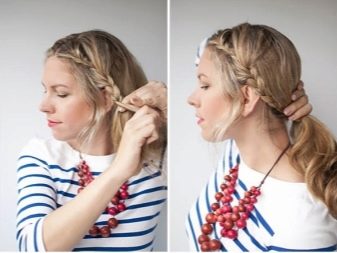
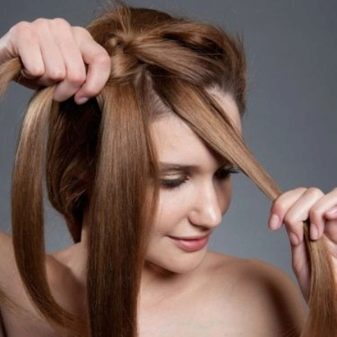
- We select a medium-sized strand at the crown, divide it into 3 parts and weave a braid according to the pattern.
- Gradually, additional strands need to be added to the main braid. We grab them on the sides from the unused mass of hair.
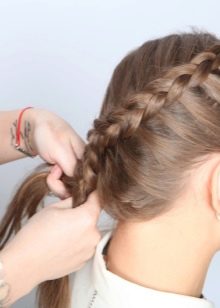
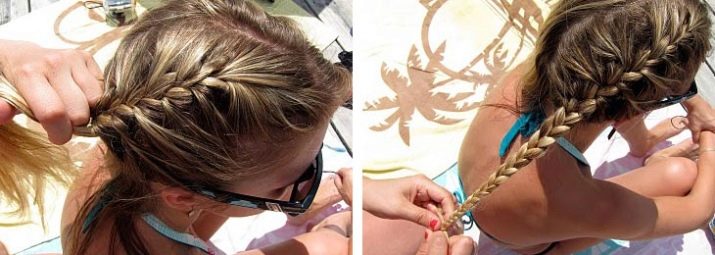
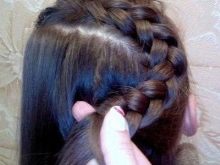
- We collect all loose hair in a single braid, weave it to the base of the neck.
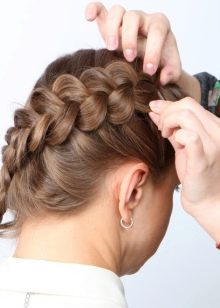
- We finish weaving using the three-strand braid technique. This is a fairly simple way of weaving, most importantly, fast.
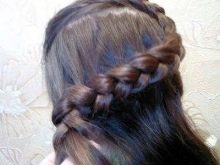
- The end of the braid can be wrapped inward, stabbed with hairpins.
- You can decorate the braid with flowers.


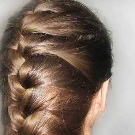
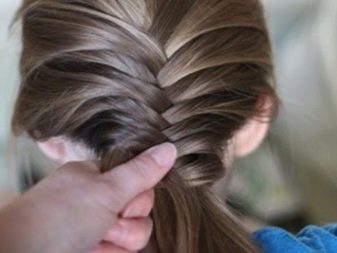
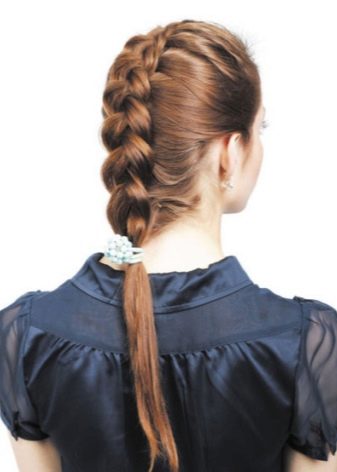
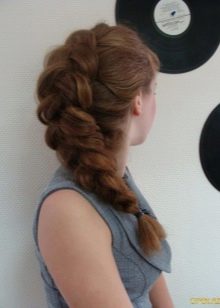
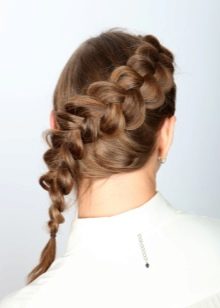
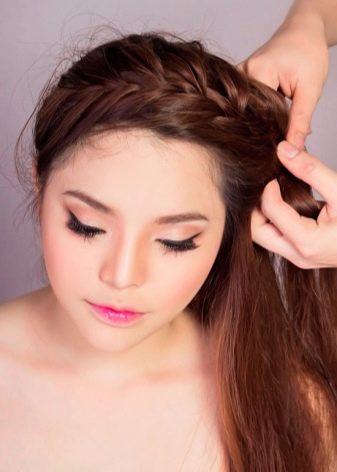
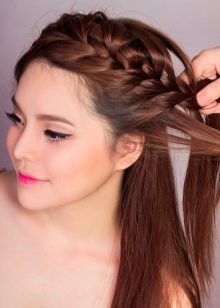
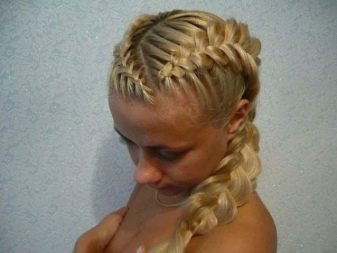
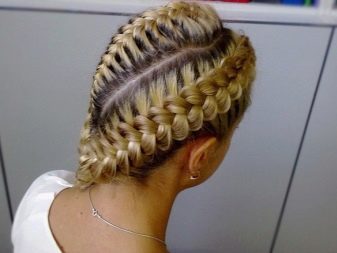
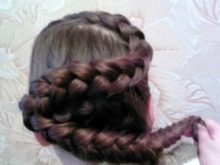
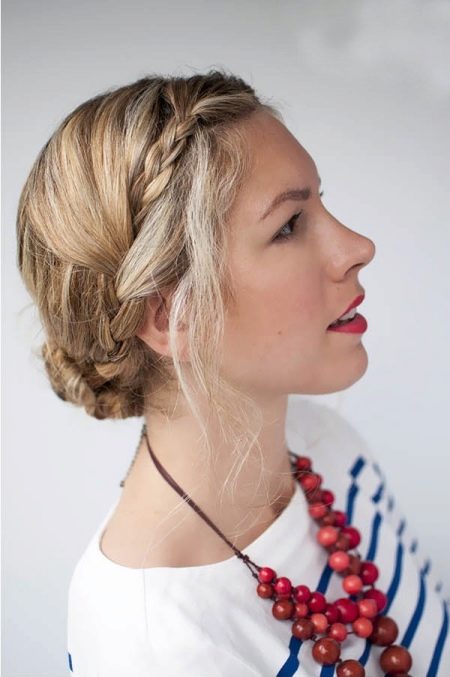
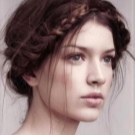
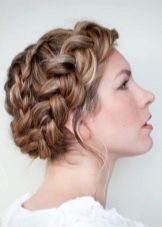
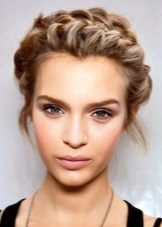
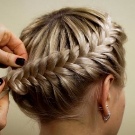
The classic spikelet has a look like French spikelet. There are quite a few varieties both in names and in techniques, but hairdressers recommend weaving such a braid in thin strands. It takes longer, but it looks elegant.
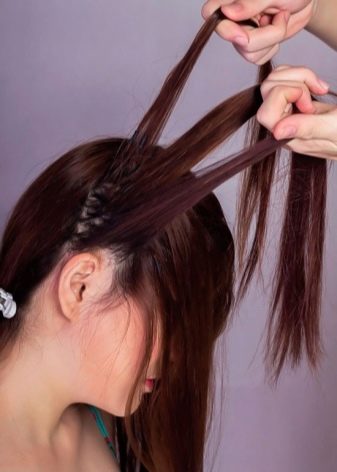
The classic weaving of a French braid consists of a few simple steps. We weave from the very top of the head.In terms of technique, it is close to the classic braid, but it has its own peculiarity. For such a weaving of a French spikelet, not only 3 strands of hair are needed, it is also required to add thin strands of the same thickness on each side. This braid turns out to be strong and interesting. This option is popular with female athletes.
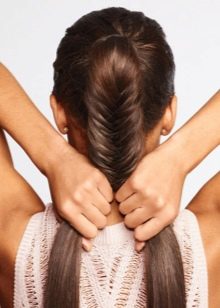
Braid in style "fish tail" always effective, and it is quite easy to weave.
An example of weaving from the back of the head:
- divide the hair into 2 parts;
- on the left next to the ear, we separate the strand, throw it over to the right side;
- on the right near the right ear we take a strand, direct it to the left side;
- alternate the previous steps until weaving is complete;
- fix the result with an elastic band.

You can complicate this weaving by mixing, for example, weaving first a French braid, then a fish tail.
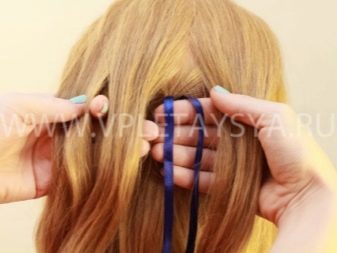
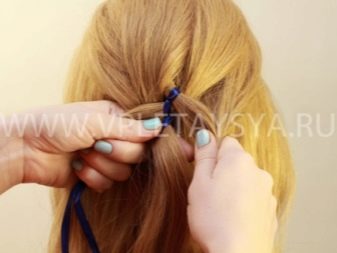
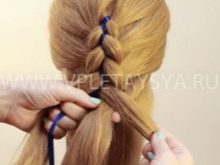
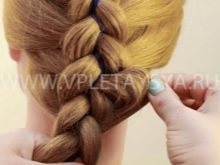
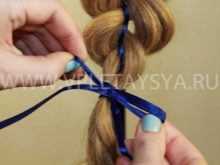
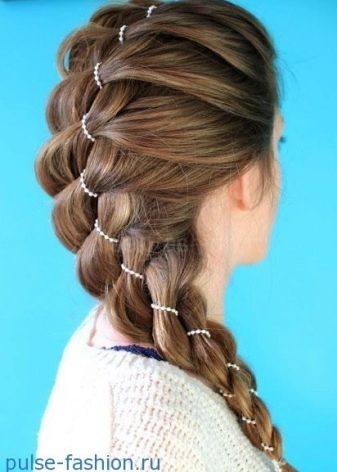
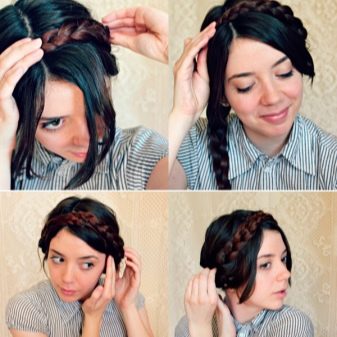
A spikelet with a ribbon can be an exquisite option for parties and gala dinners. It can be easily braided by yourself. We braid a braid with a ribbon vertically or on one side.
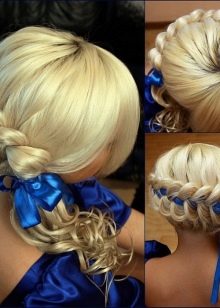
The step-by-step instructions include a number of steps.
- Apply mousse to the hair.
- Separate a bun of hair at the crown of the head. If we make it thinner, the braid will be thicker towards the neck. Take more hair - the braiding will be even along the entire length.
- Divide the resulting bundle into 3 identical parts, attach the tape to the middle strand. We take additional strands of the same size.
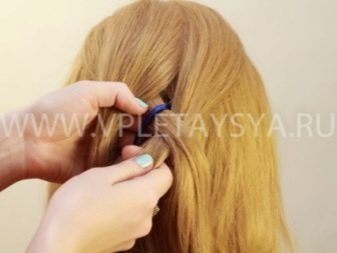
- We connect the first strands as in a regular spikelet: put the right strand on the middle one, put the left one on top. We weave the ribbon in accordance with the conceived pattern.
- With your left hand, hold the left and middle strands. With the right hand, separate the strand from the hair on the opposite side. It must be connected to the right side of the main weave.
- Weave the resulting strand into a spikelet according to the principle of ordinary weaving.
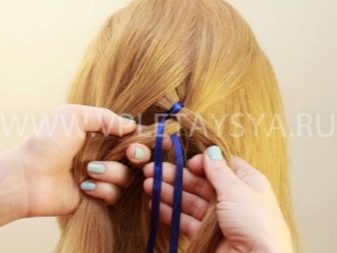
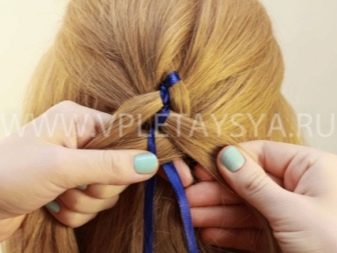
- We hold 3 strands with our right hand, with our left hand we separate a new strand from the left side.
- We connect it with the left strand of the braid, then we shift it to the middle part.
- We continue weaving, grabbing strands from the bulk of the hair on the right and left sides. Do not forget to weave a beautifully ribbon between them.
- We weave all the hair into one braid, we get 3 strands with a ribbon, which we weave with an ordinary spikelet, we fix the end with an elastic band.
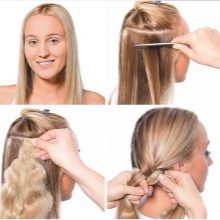
For hair, the length of the strands of which is from 15 cm, you can also use the spikelet hairstyle. Fake strands can be added to short hair. They will give thickness to hair, length, most importantly, it is easy to work with them. If the hair is only 4 cm long, then you can safely weave African braids.


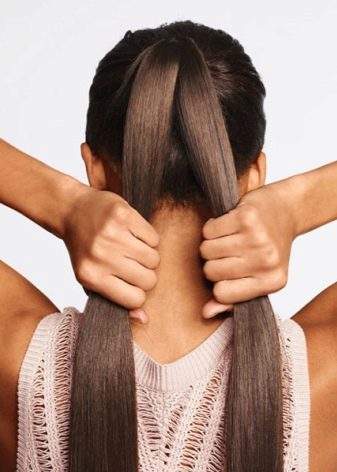
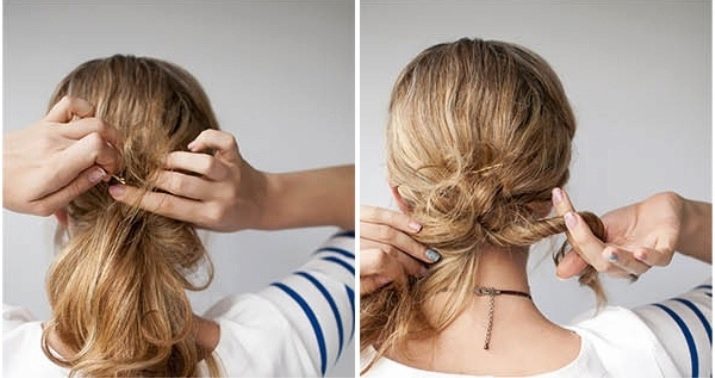
We weave spikelets from tails using a simple and quick scheme:
- select the strands on the crown, collect in the tail;
- under it we make another tail;
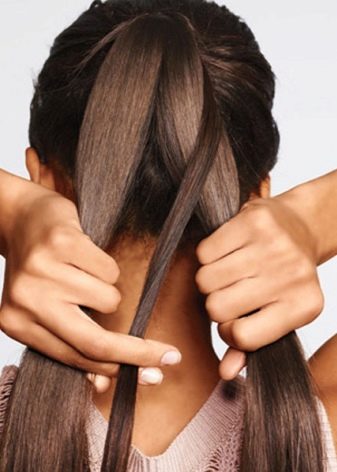
- we divide the upper one into two parts;
- we start it under the lower tail on both sides, raise the tail itself;
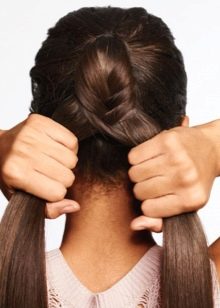
- we make another tail from the strands on the right and left and the halves of the upper tail;
- we take the top bundle, divide it in half, then weave it with new strands into the next one;
- we are working on this algorithm until the end.
Even a simple spikelet can remain neat and beautiful for a long time if you follow a few rules.
- We braid a loose braid so that the hair looks thicker.
- Fine strands of hair are best tucked in with the sharp part of the comb.
- Artificial strands will add volume to the braid. This technique is often used for evening and wedding hairstyles.
- We collect additional strands parallel to the braid, so a neat hairstyle is obtained.
- You can fix your hairstyle with mousses, gels and varnishes.
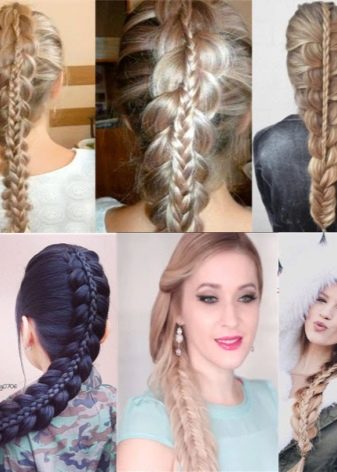
There are quite a few options for weaving a spikelet, we will consider them below.
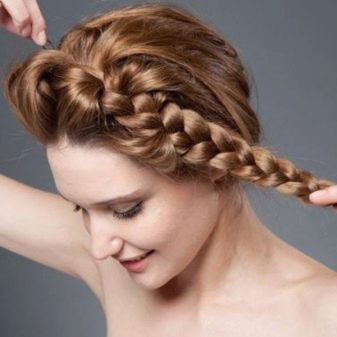
Back braid
The reverse French braid has become popular in our country over the past ten years. With her, the hairstyle looks stylish, original. The braiding takes longer than the regular braiding, but the effort is worth it. This scheme differs in that the curls go down.
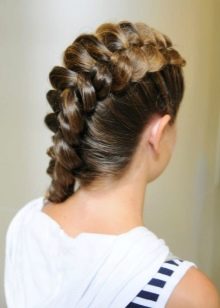
Execution technique:
- the hair on the crown is divided into 3 strands of the same size;
- skip the first strand on the left between the rest;

- on the right we do the same;
- we place the middle strand between the left and right, additionally grab part of the hair on the left side and add it to the weave;
- do the same on the right;
- weave a spikelet according to the pattern to the neck;
- we finish with the usual oblique, we fix it with an elastic band.
In order for the hairstyle to be neat and beautiful, we grab strands of additional hair of the same thickness on both sides.
If you do this weaving option yourself, without anyone's help, then you can sit between two mirrors so that you can see the whole process of work.
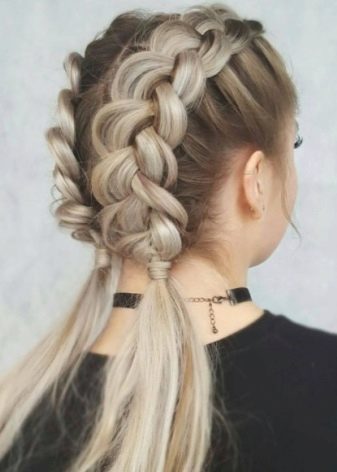
An interesting modification of this hairstyle is a double spikelet. It is becoming popular in modern fashion trends.
Here's a step-by-step guide.
- Select part of the hair on the crown, divide it into 3 parts.
- We weave a reverse spikelet, put the strands under the bottom.
- We put additional strands to the extreme curls, separate them with a horizontal parting. We pick up each extreme strand alternately from two sides.

- Separate a small bundle from the main strand, pin it with a clamp. We also make a catch of hair, weave a braid under the bottom. We perform actions on the other side in the same way.
- We braid about 1/3 of the part, then carefully begin to pull the curls by the edges. It is better to do this right away, since at the end of weaving it will be quite difficult to do such a stretch. We weave further according to the scheme.
- When the additional strands run out, we weave an ordinary spikelet, select, pin the curls. We fix the end with a clamp.
- Weave the top spikelet. For this we take a free strand. We divide it into three parts. We weave a regular braid, put the strands on top of each other. We make tie-backs from loose hair. We will weave to the end. All loose strands should be woven into the braid. We fix the ends of the two braids with an elastic band.
Hairstyle with a side scythe
An interesting option for those who want something new, stylish and youthful, but this option looks good on older women.
You need to do the following:
- we make a side parting;
- on the right, separate a small strand from most of the hair;
- we divide it into 3 zones;
- weave an ordinary braid;
- do not forget to weave additional hair on both sides;
- weave so to the neck, turn the braid to the left;
- we bring the weaving to the left ear;
- we collect all the hair, and weave a regular braid;
- We collect the tip of the braid in an elastic band.


In this weaving, it is important to adhere to the vertical direction. It is correct when the braid looks thicker on one side than on the other. To add volume, you can "pull" a few strands from the braid, creating the effect of flirty negligence.
It should be noted that such a braid is prone to quickly disintegrate, therefore, a fixing agent is applied to the hair before braiding. It is better to braid braids on "dirty" hair, which is used as a fixing method.


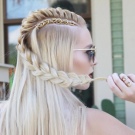
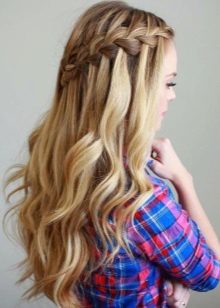
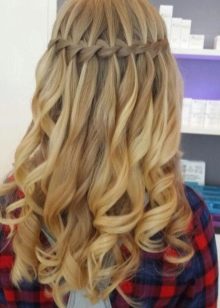
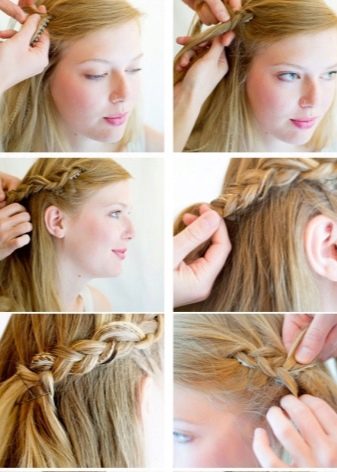
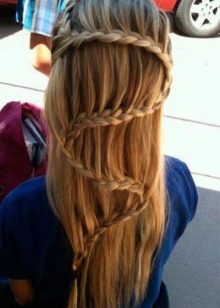
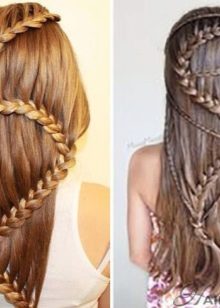
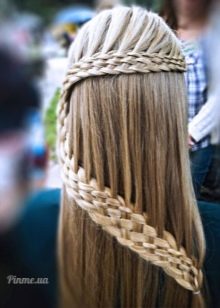
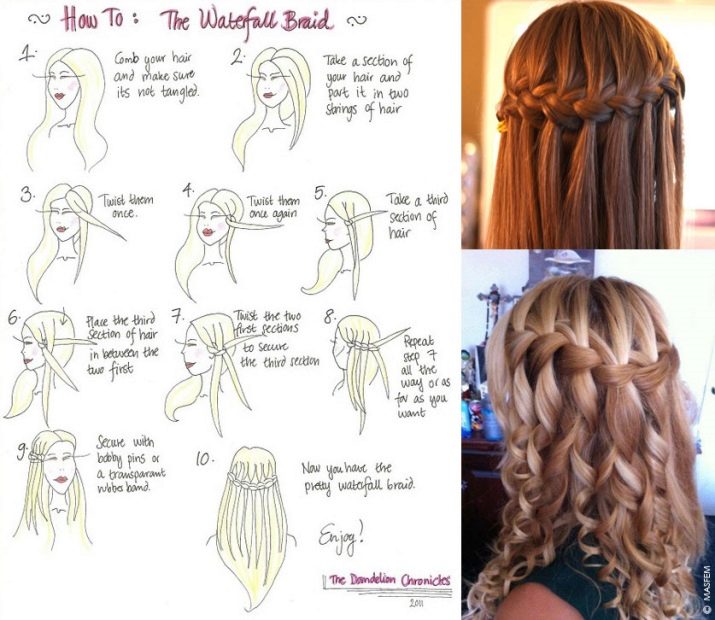
Weaving in style "Waterfall" is a side weave option.
We weave in three parts. We release strands, this gives unusual features to the hairstyle. This option is also suitable for short hair. Weaving from the temple in a horizontal direction. It can be done on one side or in an asymmetrical style, or you can consider it as an option for a rim.

Instructions for action:
- we separate a strand of hair at the temporal zone, divide it into 3 parts;
- we start in the same way as in the classic version of the spikelet;
- we transfer the upper part to the center, then the lower one there;
- again the same action;
- add hair to the top;
- we collect another strand under the lower part;
- letting go of the old one;
- move the new one to the center;
- repeat the previous steps until we reach the middle of the head;
- fix the braid;
- make a symmetrical pattern on the other side;
- connect the ends and fix with an elastic band.

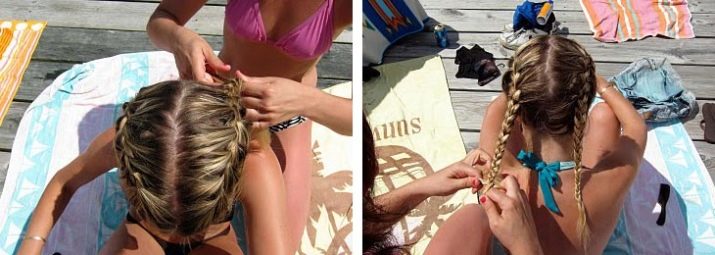
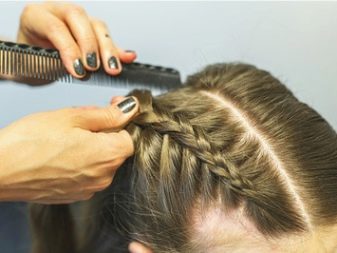
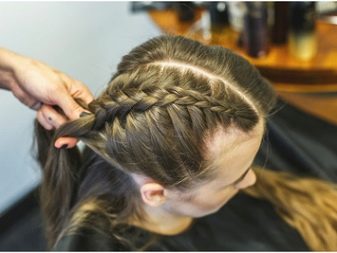
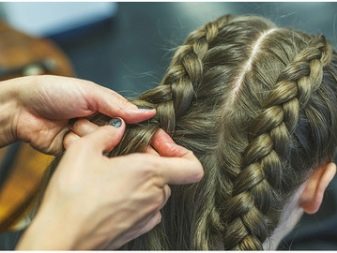
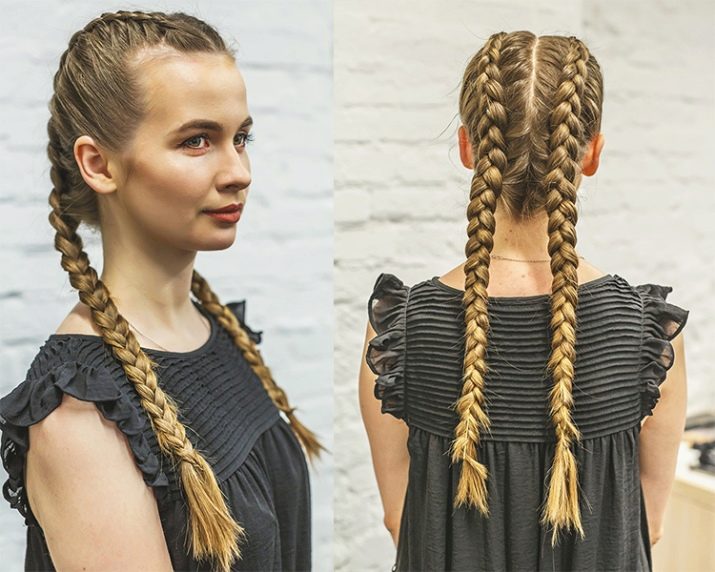
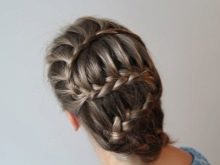
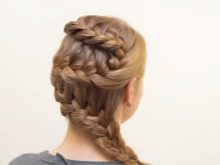
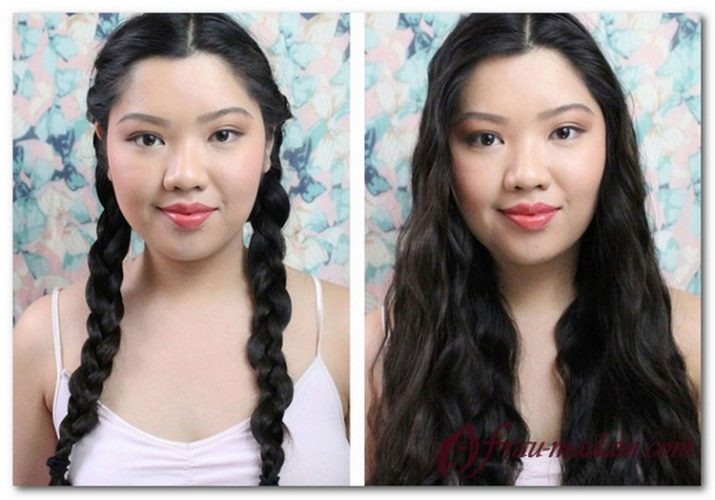
How beautiful to braid two braids?
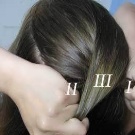
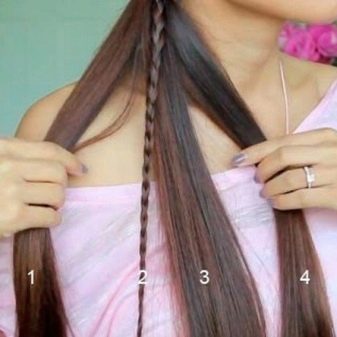
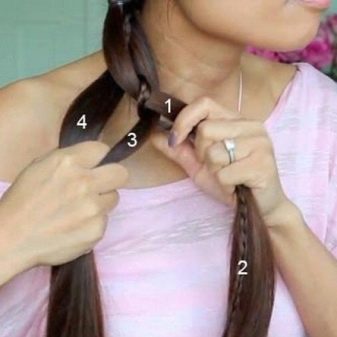
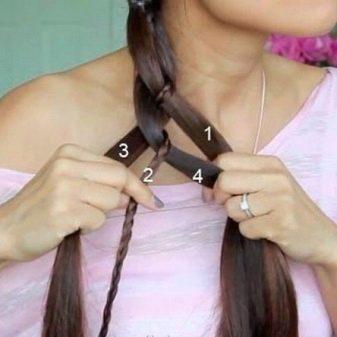
A spikelet can be woven from both sides of the head. This option has a number of secrets to which people who know how to weave simple options for braids need to go. So let's get started:
- divide the hair with a comb with a thin end into 2 equal parts;
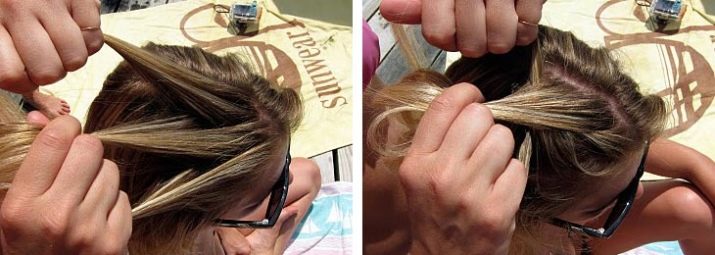
- comb, grease them with a small amount of oil or wax, so that weaving is simple, no “roosters” appear;
- we separate the area from the forehead to the ear on one side, in it we select a separate strand;
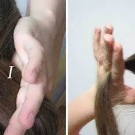
- divide into three parts, insert the index and middle fingers into the strand;
- weave according to the pattern - right under the middle, then the left under the middle;
- we continue to weave until the end of the hair, tie the tip with an elastic band;
- as an option for completing the weaving - we fold the extreme upper and lower strands and weave the spikelet in two strands.
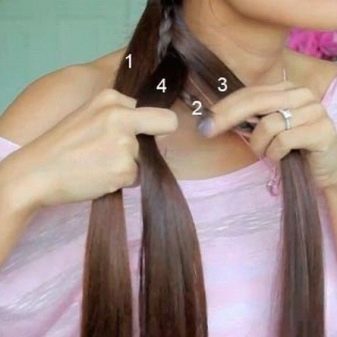
For informational content of the material, we will describe the position of the hands.
For the right braid:
- the right strand must be held with four fingers of the right hand, we put the left strand on the thumb of the same hand;
- we do everything else with our left hand, with it we separate strand by strand from the extreme part;
- we pick it up with the middle finger of the right hand and direct it under the right strand;
- from the remaining hair, we add strand by strand to the main weaving.
For the left braid:
- hold the left strand with four fingers of the left hand;
- help the right hand with the index and large to separate a thin strand;
- separate the thin strand from the extreme part with the middle finger of the right hand;
- with the index and middle fingers of the right hand, hold this strand and help with the index and middle fingers of the left hand;
- transfer to the other hand, add to the strands of the left hand;
- we move the right strand and at the same time try to hold the remaining fingers of the right hand;
- with the right hand, separate the strands on the same side from the remaining mass of hair, transfer them to the left strand.
It should be noted that the proposed spikelet weaving option is suitable for both long hair and their average length.
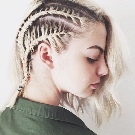
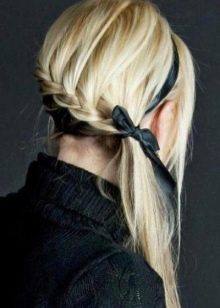
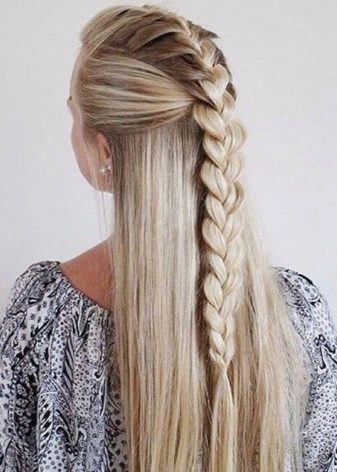
If you need to hide a long bang, then this can also be done with the help of a spikelet. This option is called boho, it is woven from one side of the parting or from both sides. We braid the braids to the earlobes, fix it, leave the rest of the hair loose.


The main features of this weaving:
- weave freely, not tight;
- we create a light careless look on the head, similar to the romantic style;
- we stretch the curls, we get additional volume;
- the basis can be any weaving, for example, straight, purl, you can simply twist the strands.
This hairstyle is suitable for beginners. The execution technique is standard, but it allows you to look casual. With this option, small errors in weaving do not spoil the result.
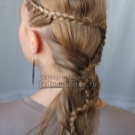
Two braids can be placed in parallel. The weave should be neat and perfect. Weaving will take a long time, but this hairstyle will definitely surprise you.
Execution scheme:
- divide the hair with a side or straight parting;
- weave the upper spikelet, then the lower one;
- we separate 3 strands of the same size;
- weave an ordinary spikelet;
- we release strands from it from the side where there will be another braid;
- weave two braids to the end;
- fasten with an elastic band or rubber bands.
Waves
We start the weaving of the wave from the temple and move further along the forehead. We add new strands only on top. Then we turn the wave in the other direction and so on.
The hairstyle turns out to be fashionable when we weave several strands located along their length of growth. We do not touch the rest of the strands.

Algorithm of actions:
- we divide the curls into 3 parts;
- weave from the forehead to the back of the head;
- we form a braid closer to the roots - a beautiful and durable hairstyle is obtained;
- we fasten the end with an elastic band.
A wave effect can be created using macrame weaving. This hairstyle looks complicated, but very beautiful. You can make waves from it all over your head.
The weaving pattern consists of three simple steps:
- weave an ordinary spikelet;
- at the end of weaving, select the middle strand, connect the right and left;
- hold the middle strand, pull the rest of the hair up, creating a slip along the strand - the pigtail turns into a macrame style;
- we fix the result with an elastic band or invisible.
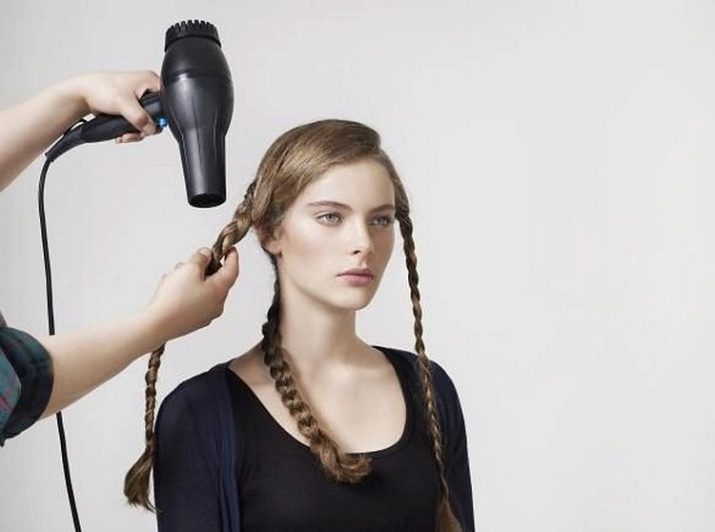
Wave styling has remained popular at all times. Often this option is used for loose hair.
In this section, we will learn how to make waves from braids for long and short hair.


First, a few simple rules for creating natural and natural waves.
- Wash your head with warm water and shampoo, and then cool water with hair balm. This process will strengthen the hair and prepare it for braiding.
- We braid the braids on wet hair.
- Apply the mousse to the finished braid.
- The step of the wave depends on the number of braids and their thickness.
- The type of wave depends on the place where the pigtail starts.
- We untwist the braids only with our fingers, without a comb.
- If you need body waves on the head, then after loosening all the braids, comb them.
- We form the waves in the order we intended.
- Then we cover the hair with varnish, gently dry it with a hairdryer.
So, the technique itself:
- divide the hair in half;
- weave braids with any previously selected technique, for example, a French spikelet;
- the number of braids depends on what kind of waves you want;
- you can weave three braids, fix them with elastic bands;
- go to bed and dissolve in the morning;
- form waves, fix them with hairspray.
It is better to braid the braids for the waves at night, so that the hair can dry well and keep the "lambs" on the head longer. If not done at night, the braids should be well dried with a hairdryer and allow enough time for the hair to dry.
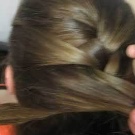
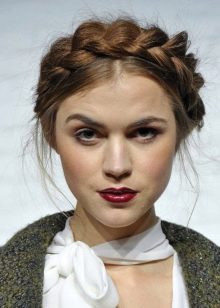
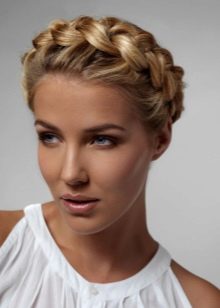
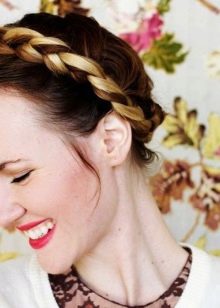
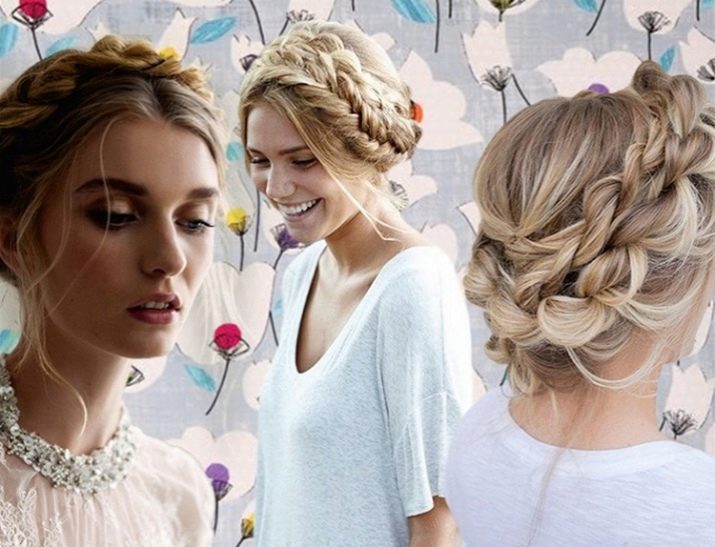
Weaving around the head
Ideal for those who like to keep their hair neatly tucked away. This type of weaving is called a "basket". In short, at the crown of the head, collect part of the hair in a bun, leave the other free. Weave a spikelet from the temple area. Take the right strand and the middle one from the extra hair, and the left one from the bun. According to this pattern, we braid the entire length. At the end of the work on the hairstyle, we fix the end with an elastic band and hide it inside the basket. A hair clip looks beautiful on such a hairstyle.

For a variety of spikelets, you can use different weaving styles. For example, combine a French braid and a fishtail.
The instruction includes a number of sequential actions.
- Divide the hair horizontally and vertically into 4 sections.
- We weave from three strands with double-sided pick-up in the lower left part.
- We pick up the strands from the top and bottom of the braid.
- We move apart the links of the spikelet.
- According to this scheme, we weave in the right direction, forming a circle. Do not forget to monitor the tension, fixing our hairstyle with two fingers - index and thumb.
- We reach the ear, if for convenience the hair was fixed with a clip, then we remove it. Weave clockwise from the bottom.
- It is necessary to follow the algorithm presented above so that the braid "on the forehead" is massive. For those who want to remove the bangs, we weave it into a braid, after sprinkling the hair with varnish so that the small hair sticks well in the hairstyle.
- Weave the braid to the back of the head, picking up additional strands of hair. Then we weave the usual version of the braid. We observe the direction of the braid to the left, without lowering it down.
- Move the braids apart, adding volume to the hairstyle.
- We fix the end of the spikelet with an elastic band. You can make a "bump" from the end of the braid.
- We pin two invisibility on the occipital region.
- We put the tail of the braid in a shell or spiral.
- Stretch the folded shell, add volume.
- We varnish the hairstyle.
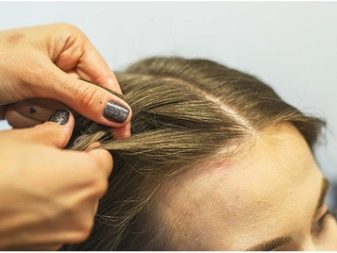
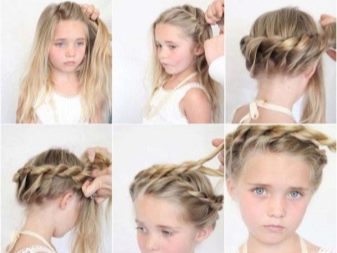
Weave a spikelet on the child's short hair:
- comb the hair, divide it into a side parting from the side of the temple to half of the head;
- we separate a thin strand with a comb, then divide it into 3 parts;
- weave, lay the left strand on the middle one, then the right one on the middle one;
- then weave in the same order, add a strand of additional hair on top;
- we braid the hair and weave it to the second ear, then weave it tighter, we do not pull the braid away from the head, we avoid airiness;
- weave according to the pattern, wrap the braid up to the temples;
- when we run out of extra hair, weave the classic version of the braid;
- we fix the tip of the braid with an elastic band, you can stab it with an invisible one, hide the tail of the braid in the hair;
- we carefully lay the pigtail along the parting, stab it with an invisible one, it is advisable to select small invisible ones to match the color of the child's hair;
- in the end, you can decorate the strands with flowers or screw-in rhinestones.
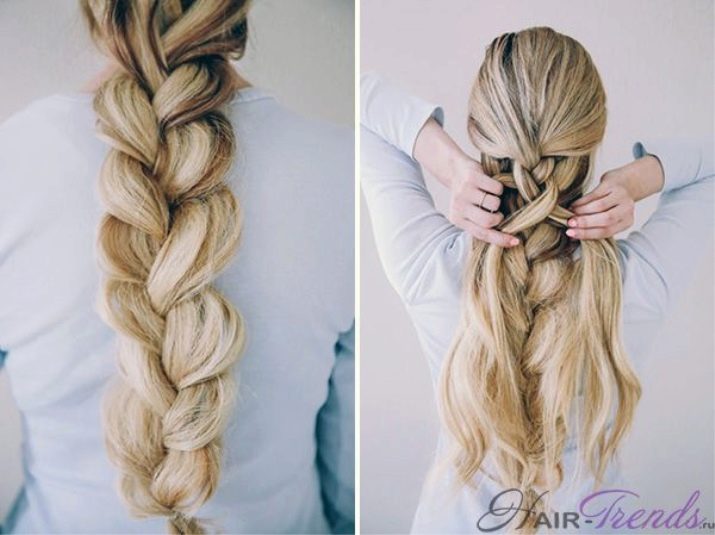
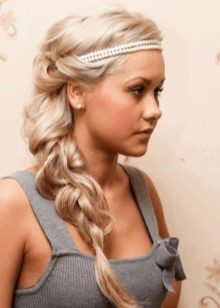
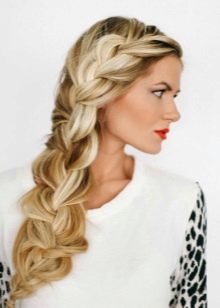
Air option
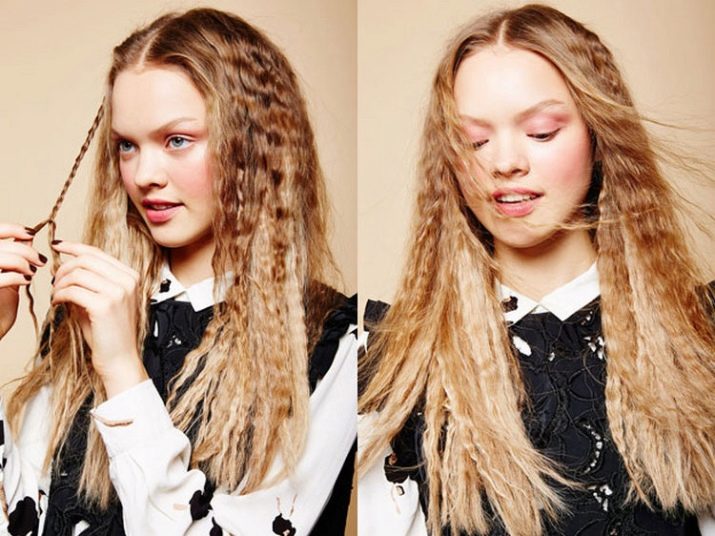
The air braid can be braided in the same way as in the above descriptions, but only loosely. Having finished weaving, we pull out thin strands from the braid, giving it additional volume and airiness.
This styling option is ideal for long hair and can diversify your everyday look.


Let's consider the execution technique.
- We divide the hair with a side parting, comb it carefully. If the parting is done from the crown to the back of the head, then it should be in the middle.
- We weave two braids from the halves, we tie them with elastic bands.
- We throw the right braid to the left. It should go over the ear, along the line of growth of the strands.
- We fix it with hairpins.
- Using the same algorithm, weave on the left side.
- Let's fluff up the braid links, you should get a visual volume and a unique airiness.
Another option for an air streamer:
- tie a high tail;
- wrap the elastic with a thin curl;
- we will stab its end with an invisible one;
- select two thick strands around the edges;
- we connect them in the middle, intercept them with a thin elastic band under the light of the hair;
- under the tail, take two more curls, connect them a little lower, intercept in the same way as in the previous paragraph;
- weave a braid to the end;
- stretch the finished version by the edges to get the volume.


To create an airy hairstyle, you must follow a number of rules:
- before weaving airy options for braids, we treat the hair with mousse;
- we make the weaving of the spikelet weak;
- fix the hairstyle with varnish.


Weaving technique in the Greek style
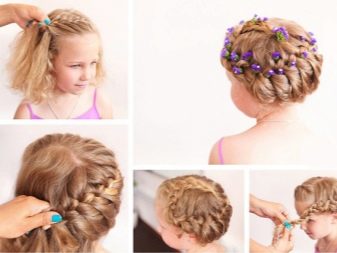
Ancient Greek beauty canons are mesmerizing. A beautiful Greek-style hairstyle can be created with curls, braids and various decorations.
There are three ways to style your hair in the Greek style - a high braid, on the back of the head or on the side. A weaving option that is woven from ear to ear is considered practical, versatile and neat. Modern trends have created various variations of weaving in this style.


This type of weaving makes the image especially feminine and romantic, turning modern girls into priestesses and goddesses of Greek mythology.
The braid can have the usual weaving option - classic and voluminous, as well as modified - a braid to one side, a braid from small braids, from strands of different colors, and so on.

Such a hairstyle with bangs to eyebrows looks spectacular and festive. To do this hairstyle, you need 5 minutes of time, a comb, hair spray and an elastic band.
Consider the weaving of a Greek spikelet in stages.
- Separate the main part of the hair and pin it at the crown.
- From this mass it is necessary not to fix the hair at the forehead and behind the ear.
- We begin to form a braid under the earlobe: separate a strand and weave a spikelet, use loose hair, add new strands from below.
- Weave a braid until we run out of loose hair. We end at the opposite ear. We braid the braid around the front of the head.
- We dissolve the left hair, and weave a spikelet further, add additional strands on both sides.
- Add all the hair while going back to the beginning. The weave should be thicker at the bottom than at the top.
- When you run out of additional strands, weave as usual.
- We straighten the braid, stretch the strands, and lay the weaving in the Greek style.
- We hide the tip of the braid under the lower part of the weaving, pin it with invisible ones.
Let's consider another option for creating a hairstyle in the Greek style, which is called "hairstyle for the Greek goddess."
- We take a wide thin strand on the crown, make a light bouffant.
- We separate another strand, do the same with it as in paragraph one.
- We continue to weave to the parietal zone.
- We process each strand with varnish.
- The volume of hair should increase significantly after such manipulations.
- Do not touch the strand of hair near the forehead. To make it original, you can sprinkle it with varnish.
- If you come across strands that stick out ugly, then we lay them with a comb, fix them with varnish.
- On the back of the head along the hairline, separate the strand for the braid.
- Weave a regular braid in 3 strands.
- We make it openwork, pull the strands to the side.
- We fix the end of the weaving. At this stage, if you wish, you can remove the front curl into the total mass of the hair.
- We put the braid over the head, fasten it with hairpins.
- By analogy, we weave a braid on the other side, lay it, fix it with invisibility.
- Use the remaining strands of hair for a side braid.
- Pull the edges of the spikelet, add volume, fix it with an elastic band.
You can decorate the gala evening with an oblique crown in the same style. Weaving Algorithm:
- we make a parting on the side, we separate one strand from the rest;
- we divide this strand into 3 identical parts and weave like a back braid;
- we do not tighten the braid, we leave a slight negligence;
- having formed a small braid, weave the usual classic braid;
- we wrap a small braid over the forehead, fix the end under the hair with an invisible one;
- we stretch part of the braid, give the effect of a lush styling.


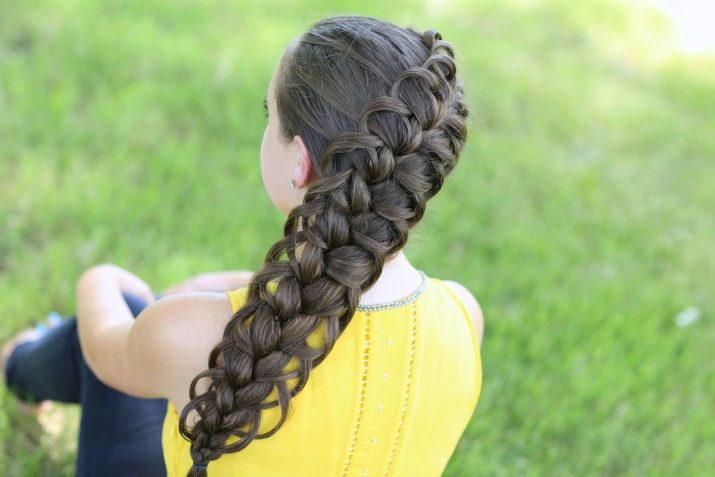
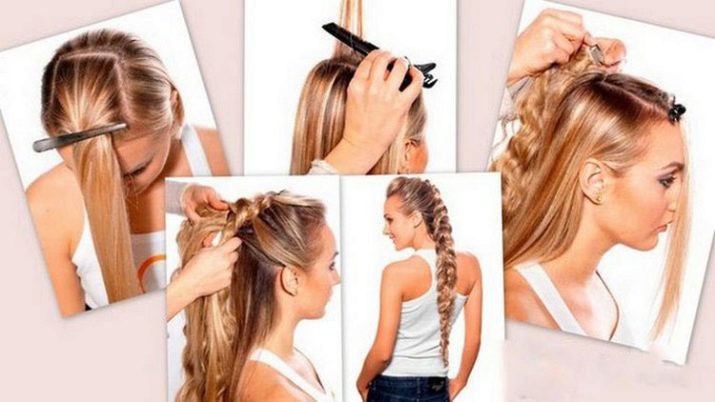
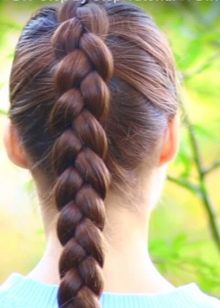
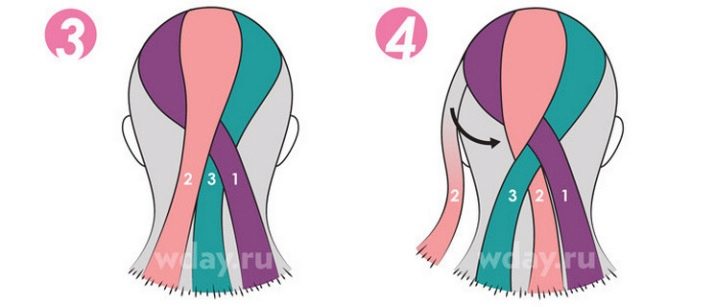
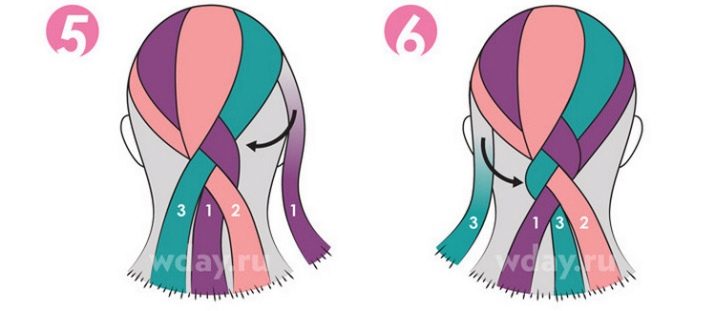
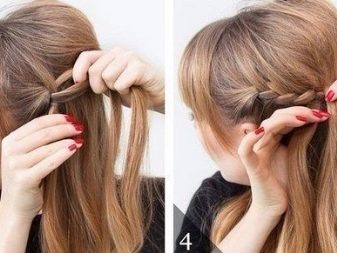
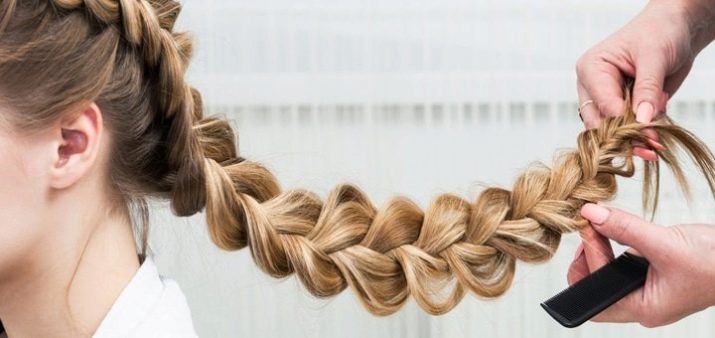
How to make a 4-strand braid?
This is a pretty interesting and cute hairstyle option. Such a braid always looks beautiful and original. This option is suitable for girls with long and thick hair. A 4-strand braid is a custom styling option, and your hair will always be tidied up.
The following is a weaving pattern.
- Divide the hair into 4 strands. We define the numbering for ourselves. Let's start counting from the left ear.
- We put the third strand on the second, push it under the first, and put the second on the fourth.
- We put the fourth strand on the first, and the third and second strands braid them.
- We push the second strand under the first, then it on the third.
- We continue to weave according to the pattern.
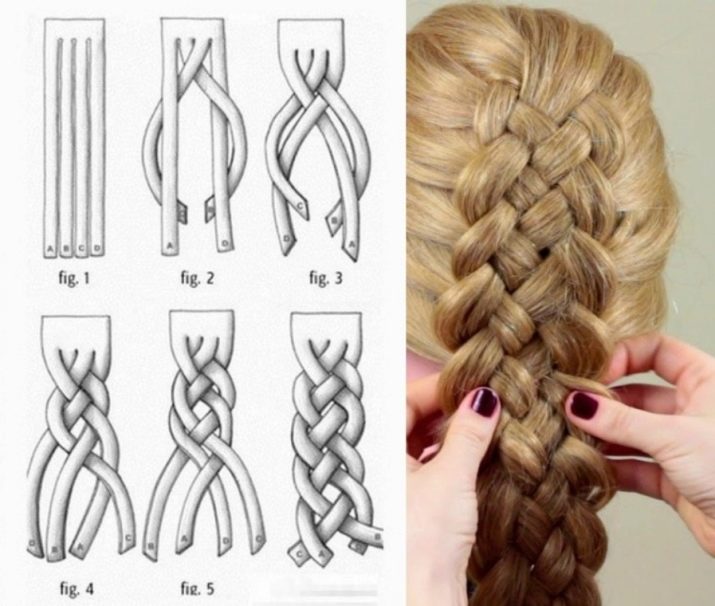
If the above weaving option seems difficult to begin with, then you can simplify your task and weave according to the following pattern: weave 3 strands like a regular braid, and the fourth is attached under the right curl.
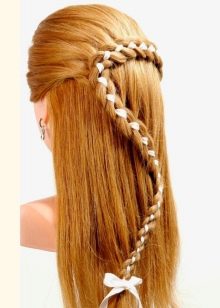
A special occasion requires not only a beautiful outfit, but also a unique hairstyle option. Consider an openwork four-strand braid reminiscent of the Waterfall style.
- We start weaving from left to right. We separate 4 strands at the temple, we take one slightly thinner than the rest.
- We put the first strand under the second, then on top of the third (this strand should be thin).
- Further, the fourth strand is crossed over the first, we direct it under the third (thin).
- From the free hair, select a part, combine it with the second.
- We turn the second strand under the fourth, and then put it on the third.
- Let the first one go down, creating the effect of a waterfall, and leave it in a free position.
- In place of the dropped curl, separate the strand from below, place it above the second, then under the third strand.

- On top of the fourth strand we attach a strand from the total mass.
- We direct this curl under the first strand, put it on the third part.
- Let the second strand go down. In its place, we grab a strand from below. We put it on the fourth, then we carry it under the third strand.
- We attach the hair from above to the first strand, then we put it under the second, and then over the third strands.
- We act in turn until we braid all the parts on the head.
- Create an openwork effect by extending the edges of the braid links.
- It is desirable to fix the end of the braid beautifully, for example, with a hairpin.
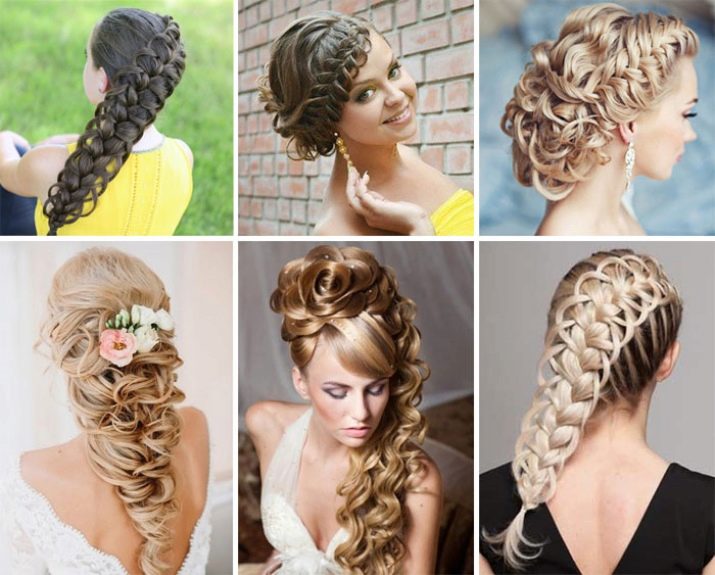
Beautiful examples
In our informative age, quite a few beautiful examples of weaving can be found. Below are suggested unusual and complex options for weaving spikelets.
Option 1
Execution technique:
- we separate a small part of the hair at the temple, divide it into 2 parts;
- we wrap the lower part around the upper part, connect it into 1 curl;
- from the additional hair from the bottom, we separate a small strand, wrap it around the upper double part;
- further weave according to the scheme, add strands of additional hair from the bottom;
- wrap the top strand, connect everything together;
- we fix the end of the hair with an elastic band and carefully hide it under the wreath on the head.
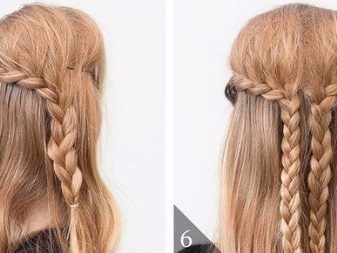
Option 2
A modification of the classic braid is this weaving option.
- Comb your hair well.
- Select part of the hair in the parietal zone.
- We divide it into 3 identical strands.
- We weave a braid in the style of a "fishtail", that is, we alternately put it under the main additional strands.
- Next, select a strand from the main part, which we will later use for the second “floor or tier”. It can be secured with a hair clip.
- We make a pick-up, weave a braid under the bottom.
- We do the same on the other side of the head.
- We continue to weave until we reach the growth zone.
- When there is no extra hair left, continue braiding in the same style.
- We fix the end with an elastic band.
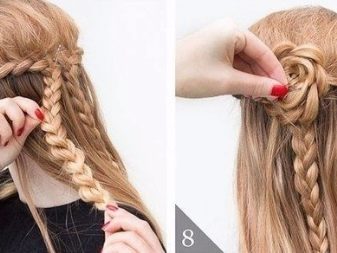
- Then we weave the upper pigtail.
- Take the bundle of hair left earlier, divide it into 3 parts.
- Weave a regular braid.
- We carry out tie-backs of additional hair.
- We connect two braids with an elastic band or a beautiful hair clip.
How to do this hairstyle is shown in the video.
Option 3. Braid and wavy hair
Unusual hairstyle for medium to long hair. The main thing is an easy version of its implementation. The technique is presented below.
- Curl your hair into thin curls with a curling iron.
- Weave an inverted braid. Divide the hair into 2 symmetrical parts.
- Each part is another 3 strands.
- We braid the braids, weave the side strands under the central one.
- We grab additional strands from the bottom.
- We leave part of the hair on top of the forehead.
- We put the braids under each other in the middle of the back of the head, fasten with pins.
- Pull the strands of curls, create volume, varnish.
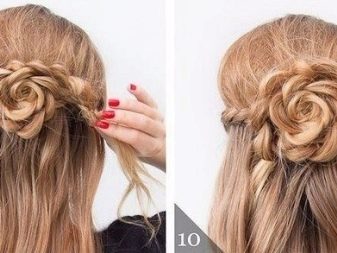
Option 4. Rose from braids
Execution scheme:
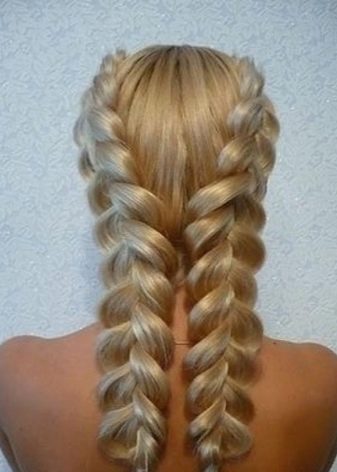
- weave 2 French braids on both sides of the head;
- we start the weaving line on the back of the head;
- we connect the braids in the place of their interlacing;
- weave a free braid from additional hair;
- we twist this pigtail with a rose at the bottom under two braids, fasten it.
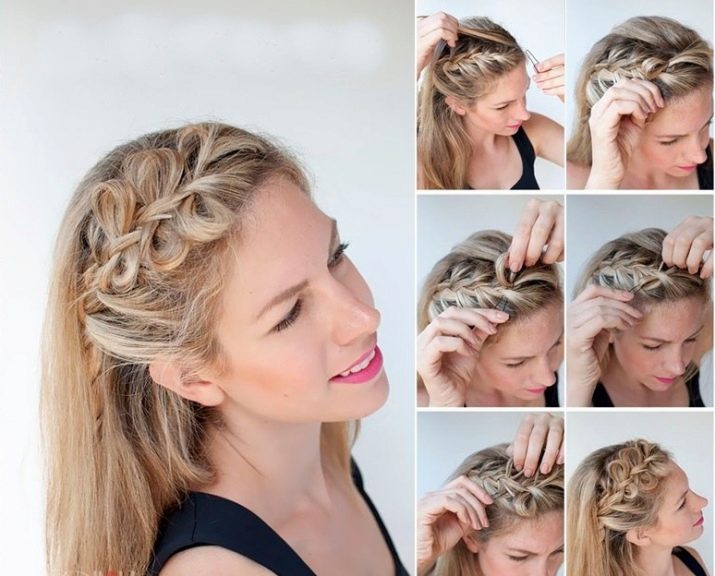
Option 5. Laying "Bow"
This hairstyle is based on a French braid. It is suitable for parties and special occasions.
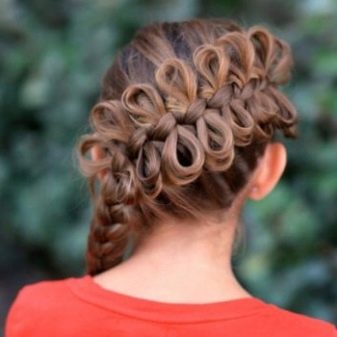
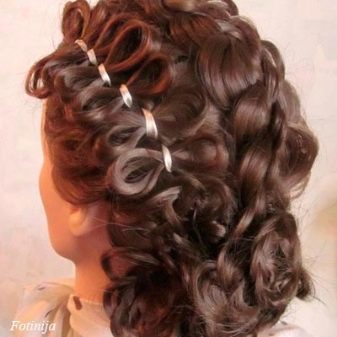
Algorithm of actions:
- make a parting in the center of the head;
- separate 3 strands on each side;
- weave a spikelet from the remaining hair;
- the strands left earlier, we stretch the braids through the strands, create "bows";
- fix the hairstyle with varnish;
- you can insert beads or ribbons into this option.
How to do this hairstyle is shown in the video.
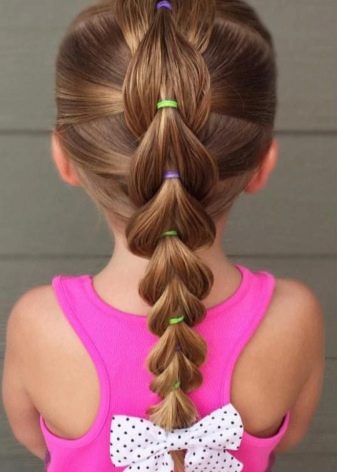
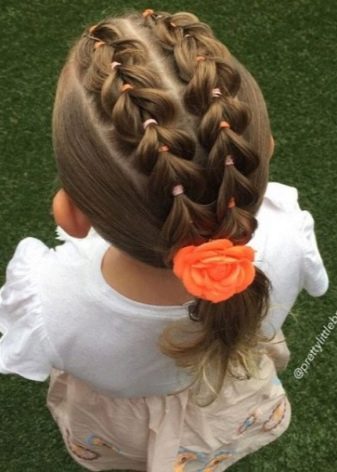
Option 6. Hairstyle from ponytails and braids for girls
The algorithm of actions is quite simple.
- Divide the hair into 2 parts.
- In each part, we divide the hairs into 4 partings.
- We fix 4 tails with rubber bands.
- Divide the second and third tails into 2 parts. We connect the first one with the left part of the second, the right part of the second with the left part of the third, the right part of the third with the fourth, fix with elastic bands.
- You should get 3 tails, divide the middle into 2 strands. Let's connect the side tails and the strands of the middle ponytail. Let's fix the result with rubber bands.
- From the resulting ponytails we weave pigtails, tie elastic bands.
Little tricks in weaving braids.
- Comb and tighten each selected strand.
- How the braid will look depends on the thickness of the strands. If the strands are thin, then the hairstyle will be romantic and neat.
- If you want the braid to look slightly sloppy, then do not pull on the strands. You can even stretch them out a little after the end of the weaving process.
- To make braiding easier, and hair does not fall apart, slightly dampen it, or wet your hands.
- If you are braiding from a ponytail, then first divide the hair into 2 parts, and then start braiding.
- Having reached the neck, you do not need to continue weaving. Just tie your hair with an elastic band at the base at the back of your head and that's it.

We remember that the new is the well-forgotten old. Simple options for the execution of a spikelet always remain in fashion, styles of past years periodically return. Yes, they are being modified for modernity, but still the spirit and memories of the past resonate in the hairdressing art in modern life.
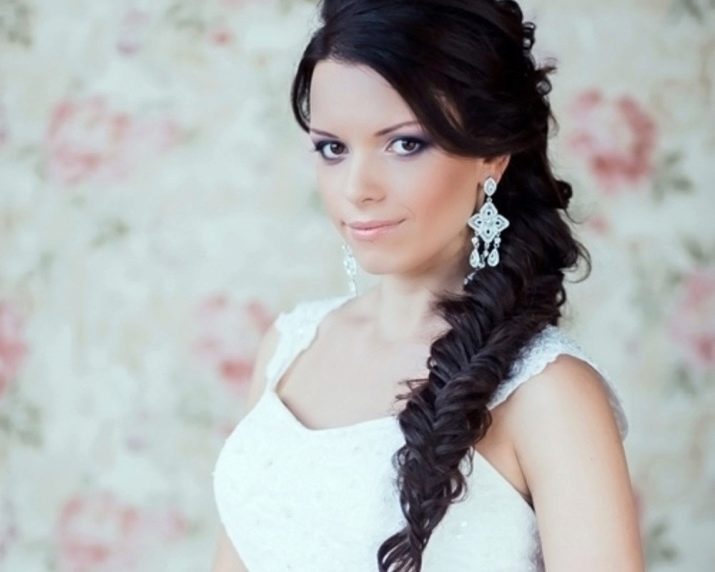
Women's braids at all times have been distinguished by their beauty, tenderness and femininity.Interesting design options for hairstyles with a spikelet and a French braid are presented in the figures of this article.