How to sew a blouse: patterns and master classes
A blouse is a truly feminine model of clothing that should become one of the important parts in the wardrobe of a modern stylish woman. Due to its versatility, it fits into a variety of fashion trends and can be combined with many styles. Many models - classic, with a peplum, in the style of a bat with lowered sleeves, with a swing collar and many others - will allow every girl to choose a suitable model and sew it with her own hands, based on her capabilities and desires.
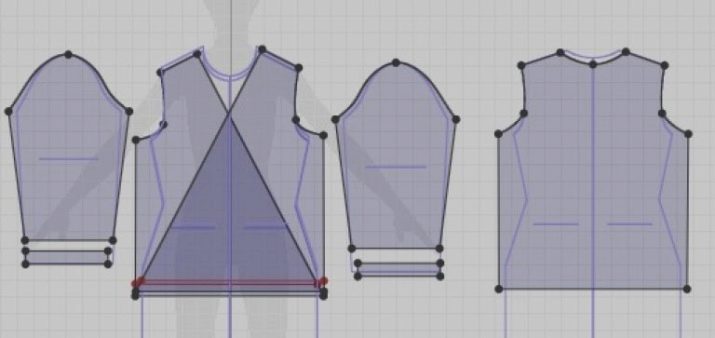
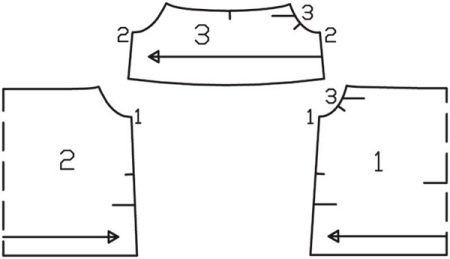
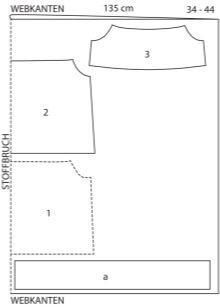
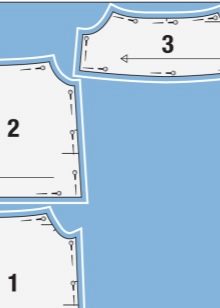
Basic pattern of a sleeveless blouse: step by step instructions
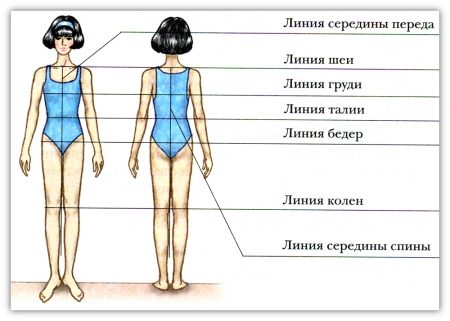
Knowing how to construct a basic pattern for cutting fabric on a blouse will open the way for sewing more complex models with sleeves and various additional decorative elements. Before starting to build a pattern, you need to measure the following parameters (the numbers are indicated for example and clarity when building a drawing step by step):
- Back (length to the waist line, cm) - 40.
- Shoulder (length, cm) - 15.
- Neck (semicircle (along the neck), cm) - 20.
- The area above the chest (semicircle (PO above the chest), cm) - 46.
- Chest (semicircle (along the chest), cm) –50.
- Hips (semicircle (thigh PO), cm) –52.
Using your parameters, and not the average values for a certain size of clothing, you can be sure that the blouse will fit exactly on the figure.
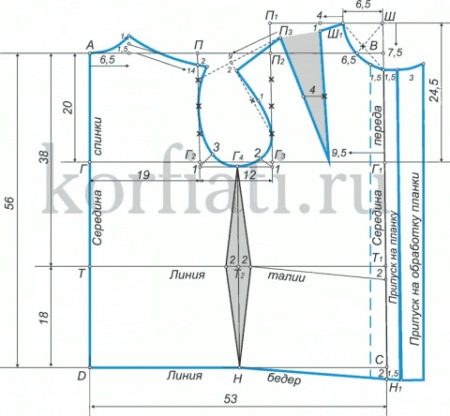
Preparatory stage - grid
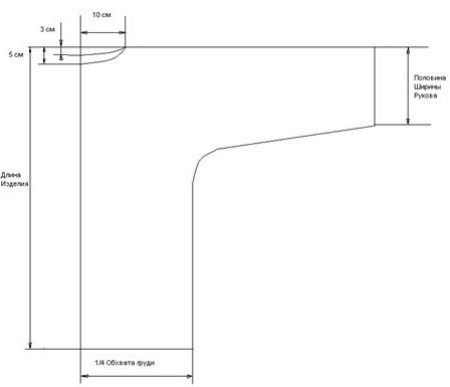
Draw a rectangle MNPK (for convenience, designate letters clockwise from the upper left corner) with the following sides:
- Sides MN and KP are equal to the sum of PO bust and 5 cm, regardless of size. For example, with 50 cm specified in the parameters, the length of the sides will be 55 cm. This is the width of the future blouse.
- Sides MK and NP add up the length of the back to the waist and 18 cm, regardless of size. For example, with 40 cm specified in the parameters, the length of the sides will be 58 cm.
- Determine the depth of the armhole - it will be the sum of one third of the breast SW parameter and 4 cm. So, with the above figure, the size of the armhole will be 21 cm.To construct it, measure the calculated distance from the end of M along the segment MK and name the resulting point G. From it draw a line segment parallel to MN to the point of intersection with side NP and mark, for example, G1.
- Determine the level of the waist. To do this, measure from the end M the length of the back (in the parameters for the example, it is 4 cm) along the MK side and name the resulting point B. From it, draw a segment parallel to MN to the point of intersection with the NP side and mark, for convenience, B1.

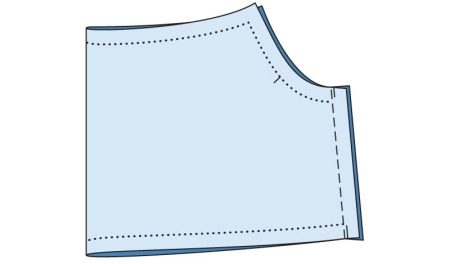
Building a pattern for the back of a blouse
- From point G measure to the right a segment equal to the sum of one third of the semicircle of the chest and 3 cm.In this case, the segment will be 20 cm. Mark the end of the segment with point G2, from which then draw a straight line up parallel to the side MK until it intersects with the upper base MN, name the place intersection with the letter O. This is the width of the back of the blouse.
- From point G2, measure to the right a segment equal to one fourth of the length of the chest - for this pattern it will be 13 cm. The end of the segment is point G3, and the segment itself shows the width of the blouse's armhole.
- From point G1, measure up a segment parallel to the side MK, which is made up of one second PO of the chest and 0.5 cm - according to the exemplary measurements made, it is equal to 25.5 cm.The end of the segment is point W.
- From point G3 measure up the same segment 25.5 cm long, the end of which is point O1, the point of intersection with the segment MN is called the letter O2. Merge points O1 and W.
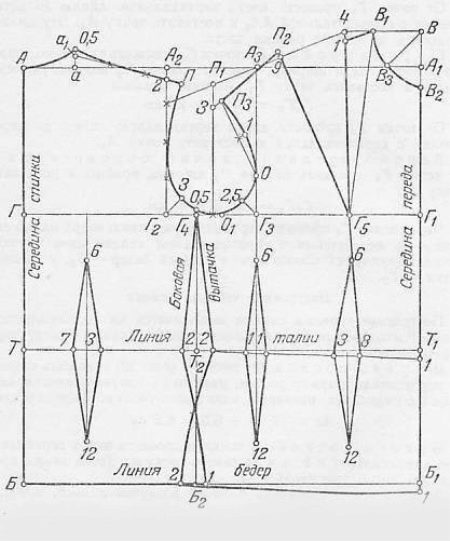
Thus, the rise of the blouse shelf is built:
- Find the midpoint of the segment G2-G3, designate the found place as G4. From it, lower the perpendicular to the segment KP, designate the point of intersection of the perpendicular with this segment as R, and with the segment BB1 as B2. This is how the side line of the blouse appeared.
- Dividing the segments O-G2 and O2-G3 into 4 equal segments, additional marks are obtained for constructing the straight shoulder girdle and armholes.
- Extend the segments O-G2 and O2-G3 by 1 cm downwards, merge the resulting ends - this is the designation of the descent of the blouse's armhole.
Back cutout markings:
- From point M measure to the right a segment equal to the sum of one third of the semicircle of the neck and 0.5 cm. For this model it will be equal to 6.5 cm. From it measure 1.5 cm upwards, and from it another 1. Combine the found point with the point M with a smooth curved line.
- Measure from point O 2 cm downwards - this will be the level of inclination of the shoulder of the blouse, along which the line of the shoulder bevel will be built further.
- From the point 1.5 cm, measured earlier when constructing the neck, through point 2, indicated when marking the slope of the shoulder, draw a segment that makes up the sum of the shoulder length (point 14) and another 1 cm (taken into account for a correct fit). It turned out the line of the shoulder cut.
- Measure from point 1, dividing the angle into two equal parts, 3 cm. Through point 14, the middle of the segment O-G2, points 3 and G4, draw a straight line for the armhole.
- From point 2 measure to the left 2 cm. Through points G4, 2 and H draw a segment that makes up the line of the side seam.
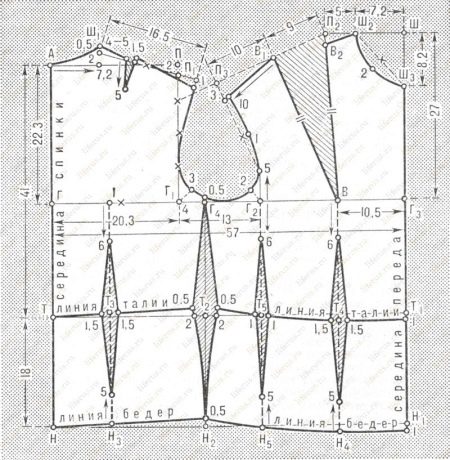
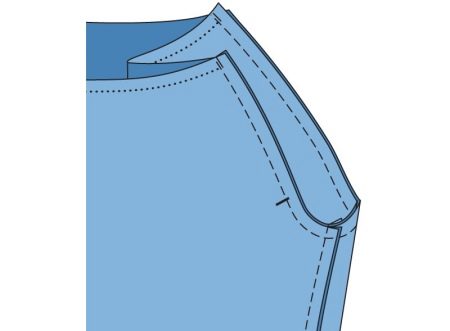
Front pattern drawing
It is built according to the following scheme:
- Measure from point W to the left a segment equal to one third of the neck + 0.5 cm. Designate its end as W1. For example, the length is 7.5 cm.
- Measure from the end W downwards a segment equal to one-third of the length of the neck + 1.5 cm.In this case, the result is a segment of 8.5 cm.
- Connect the found points W and 8.5 cm with a dotted line, find its middle and draw a segment of 7.5 cm from point W through the center of the segment.
- Merge points W, 7.5 and 8.5 with a smooth line with a bend. The result is a neckline cutout
- From the end of W1 measure 4 cm to the left, then another 1 cm down. Combine the ends of W1 and 1. From point G1, measure a segment equal to the neckline + shoulder length from the neckline to the bust dart - 1 cm. According to measurements for the sample, a segment of 11.5 cm was obtained. Combine its end with point 1. It turned out the shoulder length from cutout of the working out to the bust dart.
- At the right segment of the dart line (from 1 to 11.5), find the center and measure to the left a segment equal to the difference between the PO of the chest and the PO above the breast. The sample turned out to be 4 cm.From point 11.5 through point 4 draw a segment equal to the right dart line and mark its end with point O3.
- Unite with a dotted stroke the points O3 and the midpoint of the line segment O-G2. From the end of O3, measure with a dotted stroke a segment equal to the difference in the length of the shoulder and 4 cm (the length of the shoulder from the opening of the working to the breast dart). The segment is 11 cm. Next, you need to unite its edge with the middle of the segment O2-G3 with a dotted line. Then measure 2 cm down from point 11 and combine with O3. This is how the length of the shoulder was indicated from the chest dart to the armhole of the blouse.
- At the dotted line drawn from point 2 to the lower end of the inner division of the segment O2-G3, find the middle and measure 1 cm to the right from it. Measure from this point 2 cm, dividing the angle into two equal parts. Draw through points 2 and 1, the lower dividing point of the segment O2-G3, point 0.02 and G4, a segment that will be the line of the armhole of the blouse.
- Measure 2 cm to the right from end B2. Draw a segment through points G4, 2 and R, which will be the side seam.
- From the end of B1, measure 2 cm down and connect to point 2 from the side segment - this is how the waist level took shape.
- From the end of P, extend the segment NP by 2 cm and name the resulting end R1. Connect R and R1 - the level of the hips has taken shape.
- From the end of 8.5, indicated when constructing the neck, and point R1, measure 1.5 cm to the right and combine the counted points. Extending it 1 cm upwards, combine it with point 8.5. Add 3 cm for the clasp. The length from the waistline to the bottom is taken from 12 to 18 cm, depending on preferences.
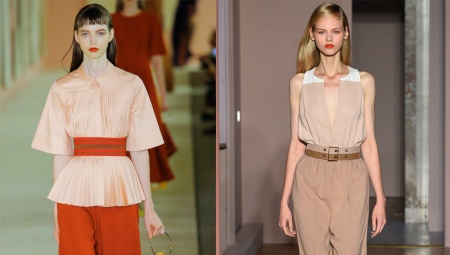
Modeling a blouse with a peplum
Basque is a beautiful piece of clothing that gives any look a feminine touch. Most often it is found on different models of dresses or on skirts, but it is also suitable for embedding in a blouse - it turns out both modest and elegant at the same time.
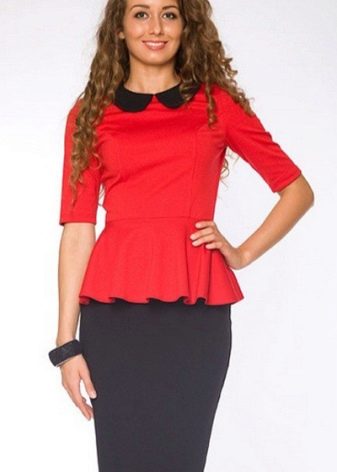
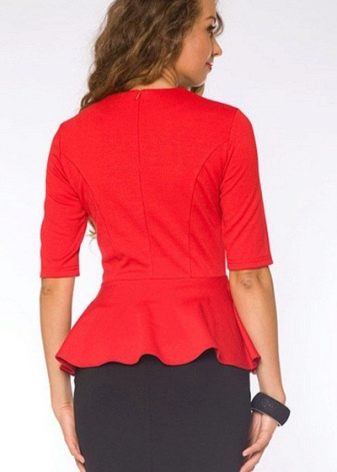
In order to independently make a blouse pattern, which includes a basque with flounces, it does not take much effort - even novice seamstresses are capable of this. Modeling takes place on the dress pattern.
It is necessary to take into account several features, the main of which is the waist line serves as the beginning of the Basque. In this case, it will not be disadvantageous to visually change the proportions of the figure.

There are only three important points when building a Basque:
- First, the waist dart is closed.
- Second - the shuttlecocks should be the same in width and turned towards the side seam location.
- Third - on both halves of the pattern, you need to build volumetric seams, with a relief, since all parts of the dart, chest and waist, will hide in them.
These are all the main points that will help you easily sew a blouse with such an elegant element as a peplum with flounces without any extra effort.
A master class on tailoring a blouse is in the next video.
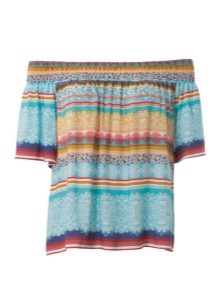
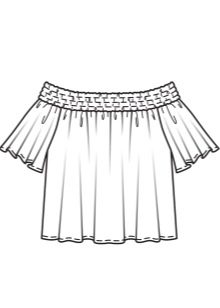
How to model a chiffon summer model?
Chiffon is an ideal material for summer clothes. Thin soft fabric adds femininity, elegance, airiness to any look. A chiffon blouse will become an indispensable wardrobe item due to the combination of lightness of fabric and classic cut and is suitable for both evening strolls and office work.
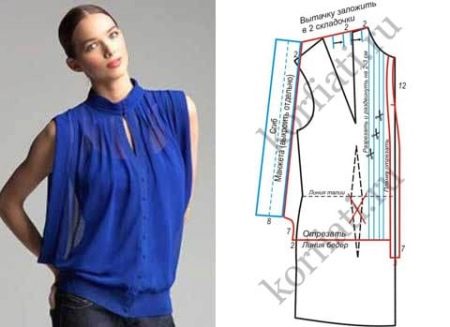
This drawing includes several decorative elements in the classic cut of the blouse:
- Wide cuffs with cuffs.
- Stand collar.
- Pleats located on the neckline and shoulders.
- Very wide armholes.
They unobtrusively decorate a strict silhouette and make it more suitable for girls and young women.
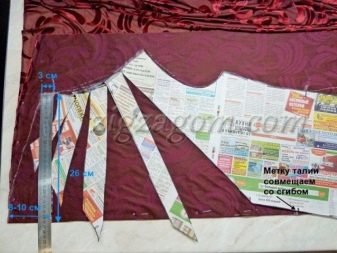
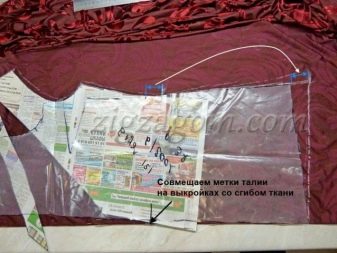
Drawing up a diagram step by step:
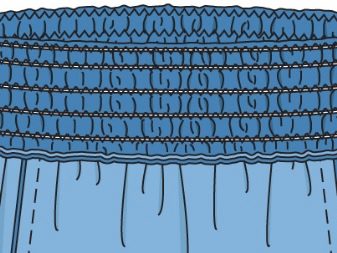
- On the base pattern of the blouse, remove the darts at the waist, leave the length of the front part only up to the hip line.
- From the middle of the neckline, measure 12 cm down. Slide a plank 3 cm wide, cut and close it separately in four pieces.
- Mark a shoulder line different from the primary construction. To do this, measure 2 cm from the shoulder to the right. From the side of the blouse, measure 2 cm to the left, then up another 7 cm, draw a smooth straight line with a bend along the pattern.
- A new cut line for the sleeve when joining the shoulder point and the side point of the blouse.In addition to it, you need to draw a cuff 8 cm wide (after stitching it will be half the size). Cut it off and close it separately.
- The bottom yoke will also be double, so you need to close it 14 cm in width, and in length it will be equal to the size of the hip girth.
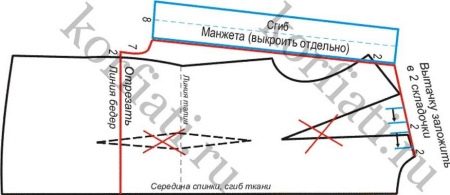
- Redraw the pattern of the back part in its entirety, excluding the neckline - it needs to be drawn in a different way and additionally build a drawing for the collar of the stand.
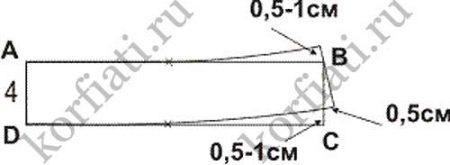
Stand-up collar construction:
- Construct a rectangle ABCD = EFGH, the sides of which EF and GH are equal to the cutout of the neckline, and the sides of EH and FG are 4 cm each.
- Measure from point G and point F 0.5-1 cm up. From the midpoints of sides EF and GH, draw equal straight lines for the collar, respectively.
- Thermal fabric will help to strengthen the inside of the collar.
Stitching (steps):
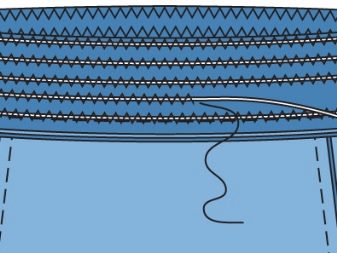
- Side seams sweep down to armholes.
- Sew the bottom of the blouse by 4 mm, then pull it to match the yoke line, evenly arrange the folds.
- Make the lower yoke stronger using a thin thermal fabric, fold the front parts with the blouse together, sweep, then stitch. Next, fold the yoke in half with the right side out, iron it, turn off the open edge and make a line.
- Sweep the parts of the planks, sealed with a thermal cloth, to the front halves and stitch. Put paired parts (pre-sealed) of the strips on the blouse strips with the front parts facing each other and also stitch them.
- Turn the planks right side up, sweep, tuck along the cut, baste again and sew at the edge along the outer sides.
- Make folds on both halves of the blouse. Sweep the shoulder seams, then grind.
- Sew on the cuffs along the cuffs for the arms, fold them inside out along the finished fold line so that they go around the armhole on both sides. Unscrew the remaining edge and sew.
- Turn the cuffs to the shoulder seams, fasten lightly and press.
- Process the collar parts with thermal fabric.
- Sew four collar loops, baste to right outer side.
- Sew a stand-up collar and stitch with three lines.
- Sew on buttonholes and sew on buttons.


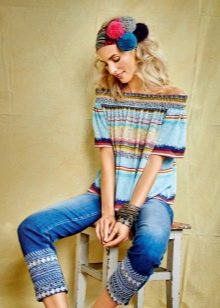
Wrap-around model
A wrap blouse will look good with both skirts and jeans and is suitable for wearing in different life situations. Usually such a model is sewn in the version with long sleeves, since the neckline is deep enough, and in this case there is no need to open additional parts of the body.
The cuffs on the sleeves add a discreet and snug style.
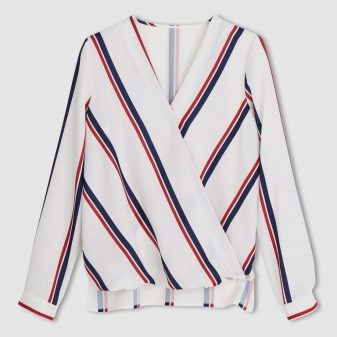
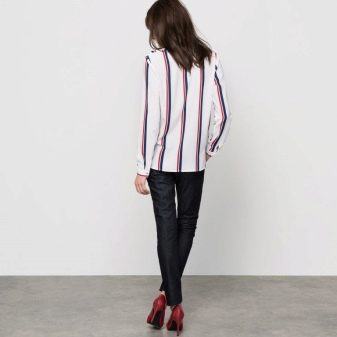
The main element of such a model is the smell.... It is necessarily sewn with a clasp, since by itself it is not designed to maintain a closed shape and can open at any time, which is a feature of its structure. The lengthened back makes the blouse look like a classic-style shirt, and there is an elastic seam in the front that allows the fabric to hang freely.
By adding several necessary elements to the usual pattern, you can get an extraordinary and multifunctional item that fits any element of a woman's wardrobe.
See below for a master class on tailoring a wrap-around blouse.
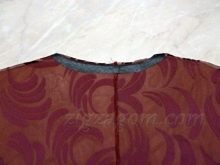
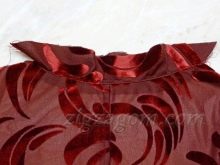
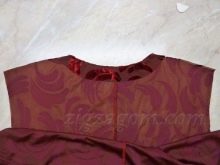
We easily and quickly cut out "Carmen" with our own hands
The style "Carmen" is not accidentally named after the Spanish woman. This name refers us to Spain, namely to its flamenco dance style, in which the upper part of the garment was made with a neckline that opened the shoulders and was decorated with many frills. He moved into everyday life today.
A blouse with such a collar is sewn very easily and quickly and is suitable even for beginners, however, with all the simplicity of the cut, it looks very impressive.
Sewing is carried out as follows:
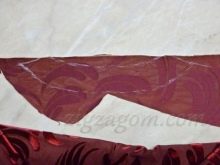
- Fold the facing of the cut and the front part with the front sides, prick along the line of the future cut and sew next to the three marked sides. Cut both parts between the lines. Turn the facing inside out, iron the cuts along the edges. Then fold the edging by 0.75 cm, sweep. Sew the front at the edge slits.

- Make seams on the sides + for the sleeves.Sew short cuts along the frills of both sleeves.
- Stitching with frequent, narrow zigzag stitching along the hem of the sleeves. Iron the allowance along the cut to the wrong side, sew along the fold line with a small tight zigzag, cut off the excess allowance from the wrong side.
- Gather up the frills from the top of the sleeves to the bottom, and sew to the bottom.

- Sew sleeves into armholes. Neaten and press seam allowances.
- Overcast the neckline with a tight, narrow zigzag stitch. Iron the allowance on it inside out, lay a small tight zigzag stitch on the front side, cut off the excess allowance from the inside out.
- Iron the allowances on the drawstring strip inside out, along short and longitudinal cuts. Pin the strip from the inside out, aligning all the edges, sew according to the markings.
Sew the strings up to 0.5 cm and insert them into the drawstring.
- Fold up the hem allowance and sew 1.5 cm from the edge.
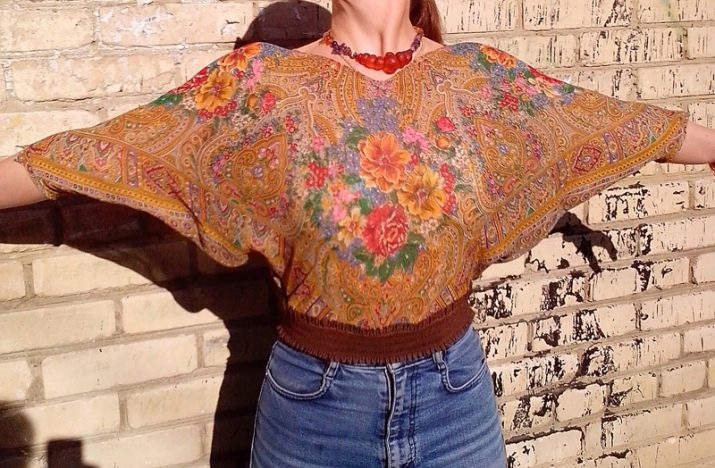
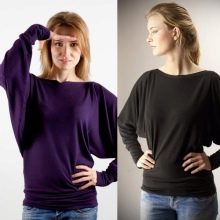
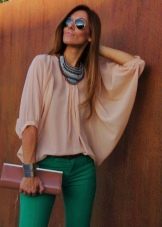
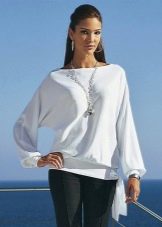
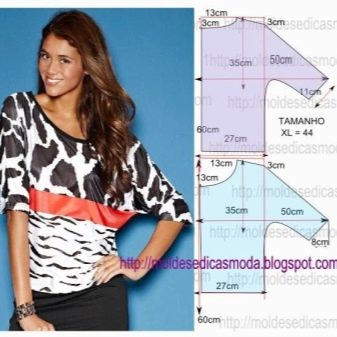
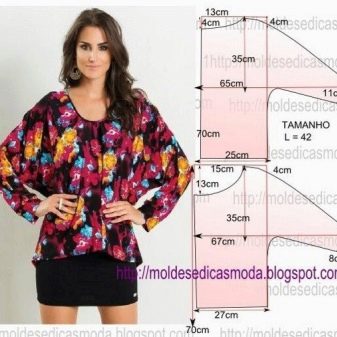
Blouse patterns with a lowered sleeve and a bat
Bat-style garments, with loose, pulled-down sleeves, sit freely and do not restrict movement. Such models, thanks to the soft curves of the fabric, make the image more feminine and delicate. They give a special accent to the hands of girls. The loose fit is suitable for any type of figure, it will be appreciated by both slender and larger women.
Sewing such a model is also not difficult, but simplicity does not mean lack of style here, rather, on the contrary, style in simplicity.
Sewing elements:
- A jersey fabric 1.5 m wide and a length including the length of the front and back of the blouse, and another 40 cm for the hem, belt, and cuffs.
- Cuffs are sewn from rectangles with sides of 14 cm and wrist circumference + 6 cm for seam allowance.
- Base pattern
The belt is sewn with a length depending on the volume of the hips - up to 100 cm - this is 1.5 m, for 100 cm or a little more - this is 1.7 m.Its height, like the cuffs, is 14 cm. allowance and hem.
When choosing a fabric for sewing, you should think for which season a particular model is made.


In summer, models made of chiffon, linen or cotton will look beautiful - they let air in in hot weather, which allows the skin to breathe and regulate body temperature. For autumn, a more suitable option would be knitted fabric, velor or cashmere.
The sleeve can be of different lengths, usually a shorter one is taken for the summer, and a longer one for cool weather. Universal length - ¾, it looks most advantageous on such models, making a beautiful accent on the hands.
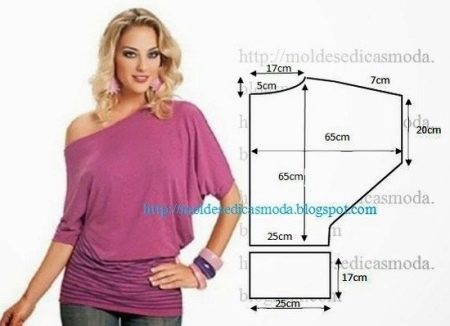
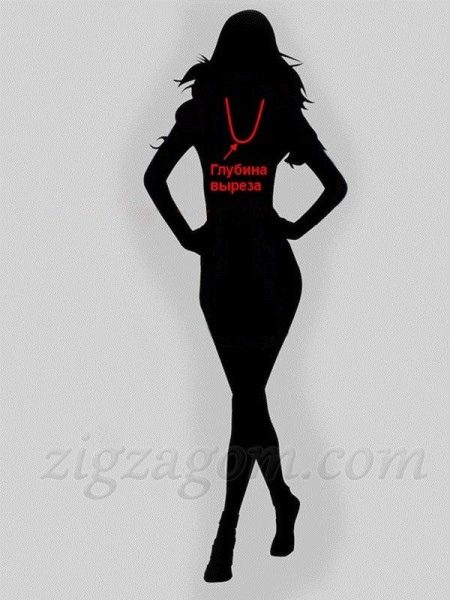
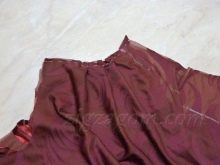
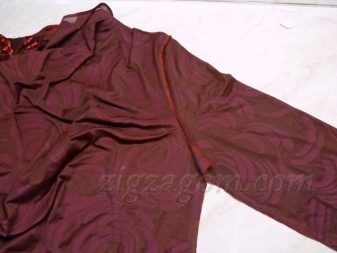
Swing collar model: master class for beginners
A swing-necked blouse - draped over the chest - has long been one of the most sophisticated options for women. It favorably emphasizes the neckline and décolleté area, focusing on the head - therefore, in addition to the blouse itself, it is worth taking care of the hairstyle and makeup.
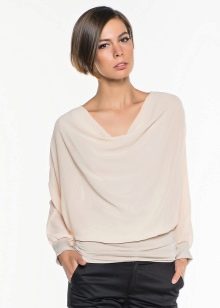
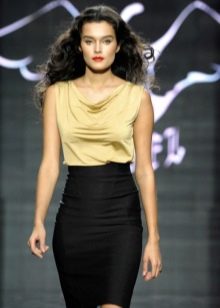
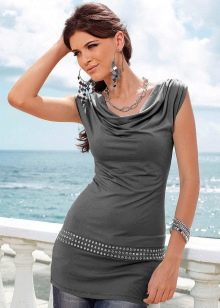
This is a model of simple cut, but it requires little attention to the marking of the drapery, so a person who has little or no relation to sewing can cope with it.
The fabric to be sewn should be easy to drape, it is best to use a soft knitted fabric. And panne velvet will give even a blouse of the simplest cut a festive look.
Materials:
- The fabric is 1.4 m wide and approximately 1.3-1.5 m long (depending on the length of the blouse, sleeve and allowance);
- 3-4 spools of thread (for working out seams, zigzag and overlock);
- Chalk and scissors;
- Non-woven
Stages:
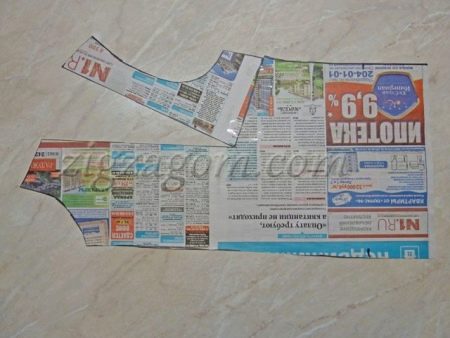
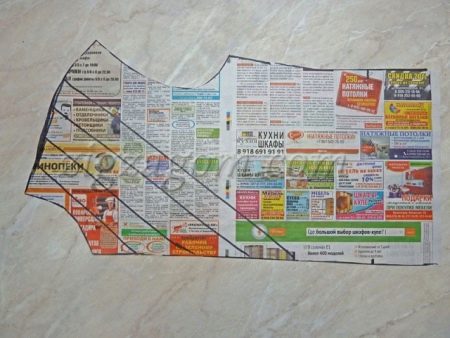
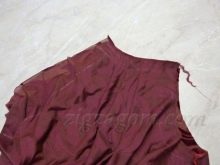
- Take a suitable base for a blouse and transfer it to paper (you can take either ready-made or draw according to individual measurements).

- Cut a dart around the waist.

- Cut out the bust dart, move it aside and secure. Draw the resulting diagram again on another paper.
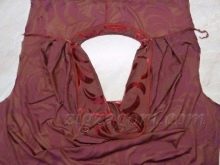
- Draw diagonal lines from the shoulder line to the center of the front part (along the dart solution).
- Measure out the desired cutout and halve the resulting number.
- Transfer the pattern to the fabric. It is important to get a smooth shoulder line and leave seam allowances.
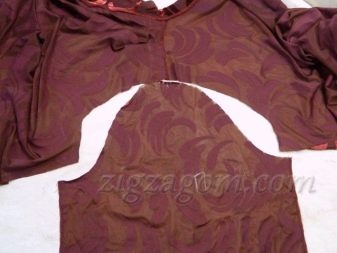
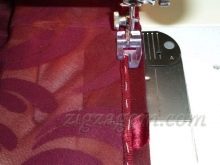
- We cut out all the details and sew the back details first (when using a typewriter, you need to process the edges with a zigzag). First comes the backrest and facing, pre-treated with non-woven fabric. Sew, smooth the seams, press the allowances towards the facing and sew at a distance of 1-2 mm from the edge. Next, wrap the facing to the wrong side and steam, trim off the excess edges.

- Aligning the front and back trims, fold them seamy side out. Sweep half the distance of the shoulder line along the sleeve, and divide the rest of the fabric into three equal folds, located towards the neck. Duplicate on the other shoulder and stitch.
- Sew a single stitch over the overlapping edges of both pieces using an overlock. Turn the facing on the back inside out, align the seams at the shoulders and fasten by hand.

- Sew the sleeves into the holes for them.
- Overlock the bottom of the blouse.
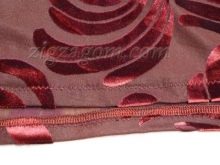
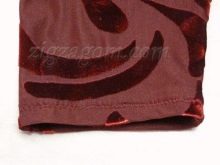
If it turns out that the jersey has a transverse direction, then it must be secured with a zigzag seam so that it does not stretch all the time. Process the bottom of the sleeve with the same seam. It is convenient because it stretches a little and does not burst.

The blouse is ready!
There are different models of blouses with this type of neckline. There are models with short sleeves that are more suitable for the summer. An interesting solution would be to add drapery along the side seam, and with the help of an additional built-in drawstring, adjust its volume.
You can see other master classes in the following videos.


